设置 Okta 单点登录
OpenID Connect (OIDC) 是位于 OAuth 2.0 协议 之上的简单身份层。它允许客户端根据身份提供商执行的身份认证来验证最终用户的身份,并以可互操作和类似 REST 的方式获取有关最终用户的基本个人资料信息。
Okta 提供了一套全面的身份和访问管理工具,旨在支持安全且可扩展的用户身份认证,使企业能够简化跨各种应用程序和设备的访问控制。
本指南将向你展示如何使用 openid-connect 插件,通过授权码授予和客户端凭证授予将 APISIX 与 Okta 集成。
前置条件
- 安装 Docker。
- 安装 cURL 以向服务发送请求进行验证。
- 按照 快速入门教程 在 Docker 或 Kubernetes 中启动一个新的 APISIX 实例。
- 拥有一个 Okta Workflow Identity Cloud 帐户。
配置 Okta
在本节中,你将创建一个应用程序集成并配置所需的详细信息。
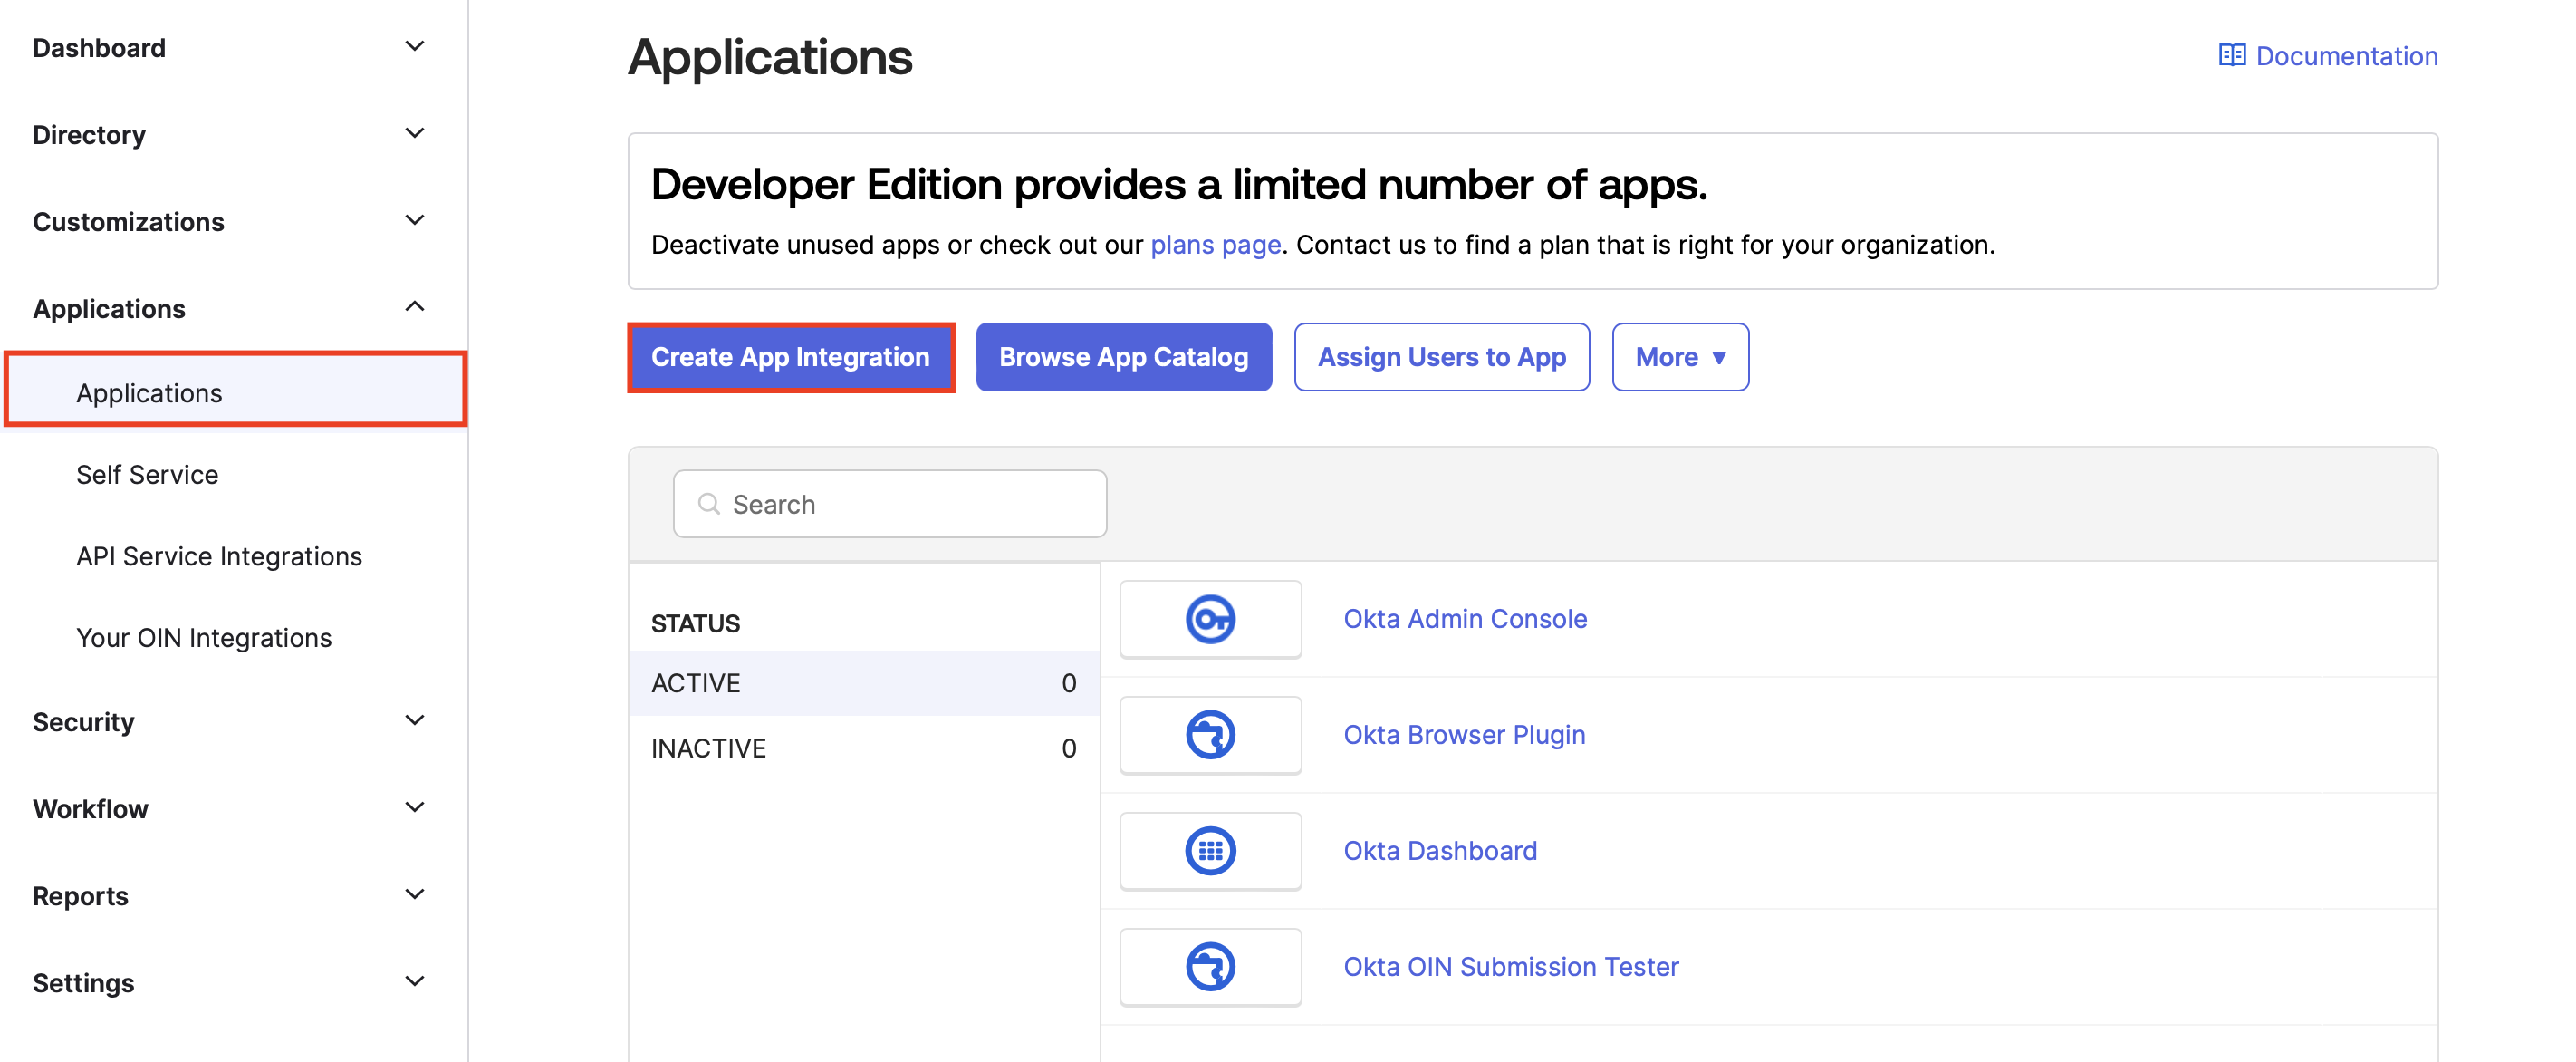
创建应用程序集成
在 Okta 中,从左侧菜单中找�到 Applications 下拉菜单,选择 Applications,然后单击 Create App Integration:
选择 OIDC - OpenID Connect 作为登录方法,选择 Web Application 作为应用程序类型:

单击 Next。继续填写详细信息:
- 输入应用程序集成名称
- 为授予类型选择 Authorization Code 和 Client Credentials
- 将
http://localhost:9080/anything/callback添加到 sign-in redirect URIs

对于 controlled access,你可以 暂时跳过组分配 (skip group assignment for now),或相应地调整访问权限:

单击 Save。
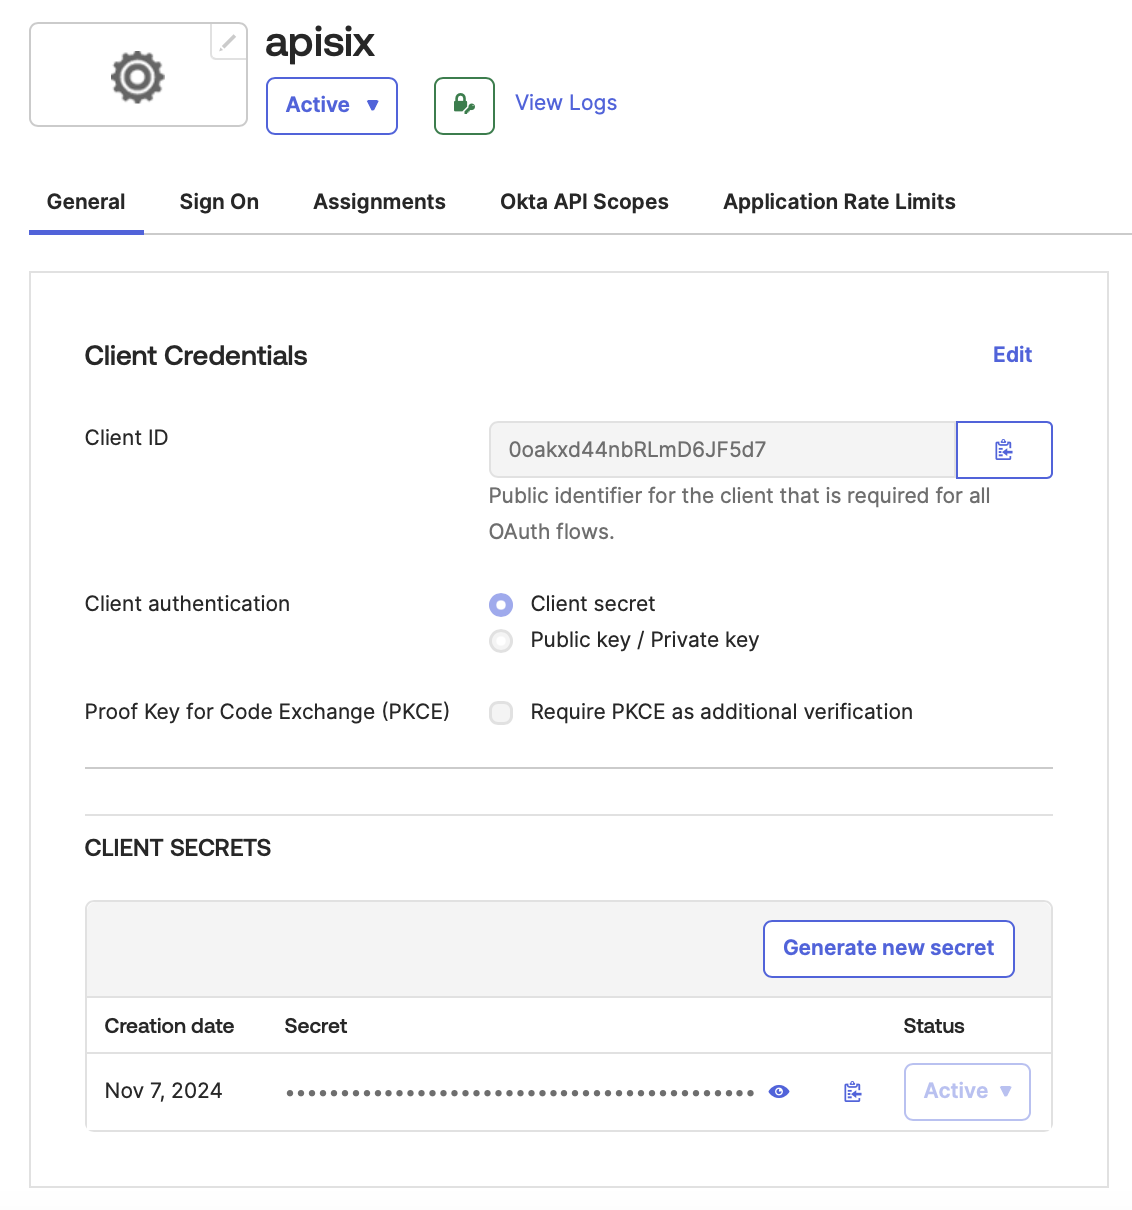
查找客户端 ID、Secret 和域
创建应用程序后,在应用程序的 General 选项卡下找到客户端 ID 和 secret:
通过单击右上角的用户名找到 Okta 域:

将客户端 ID、客户端 secret、Okta 域名和授权服务器保存到环境变量,以便在 APISIX 中进行配置:
# replace with your values
export OKTA_CLIENT_ID=0oakxd44nbRLmD6JF5d7
export OKTA_CLIENT_SECRET=h4B_dqp_QnIIzZiDG9MSM_tr4QJJkuEj8CF8iw9jGaBak7m60cArKdsHPf
export OKTA_DOMAIN=dev-02223846.okta.com
export OKTA_AUTH_SERVER=default
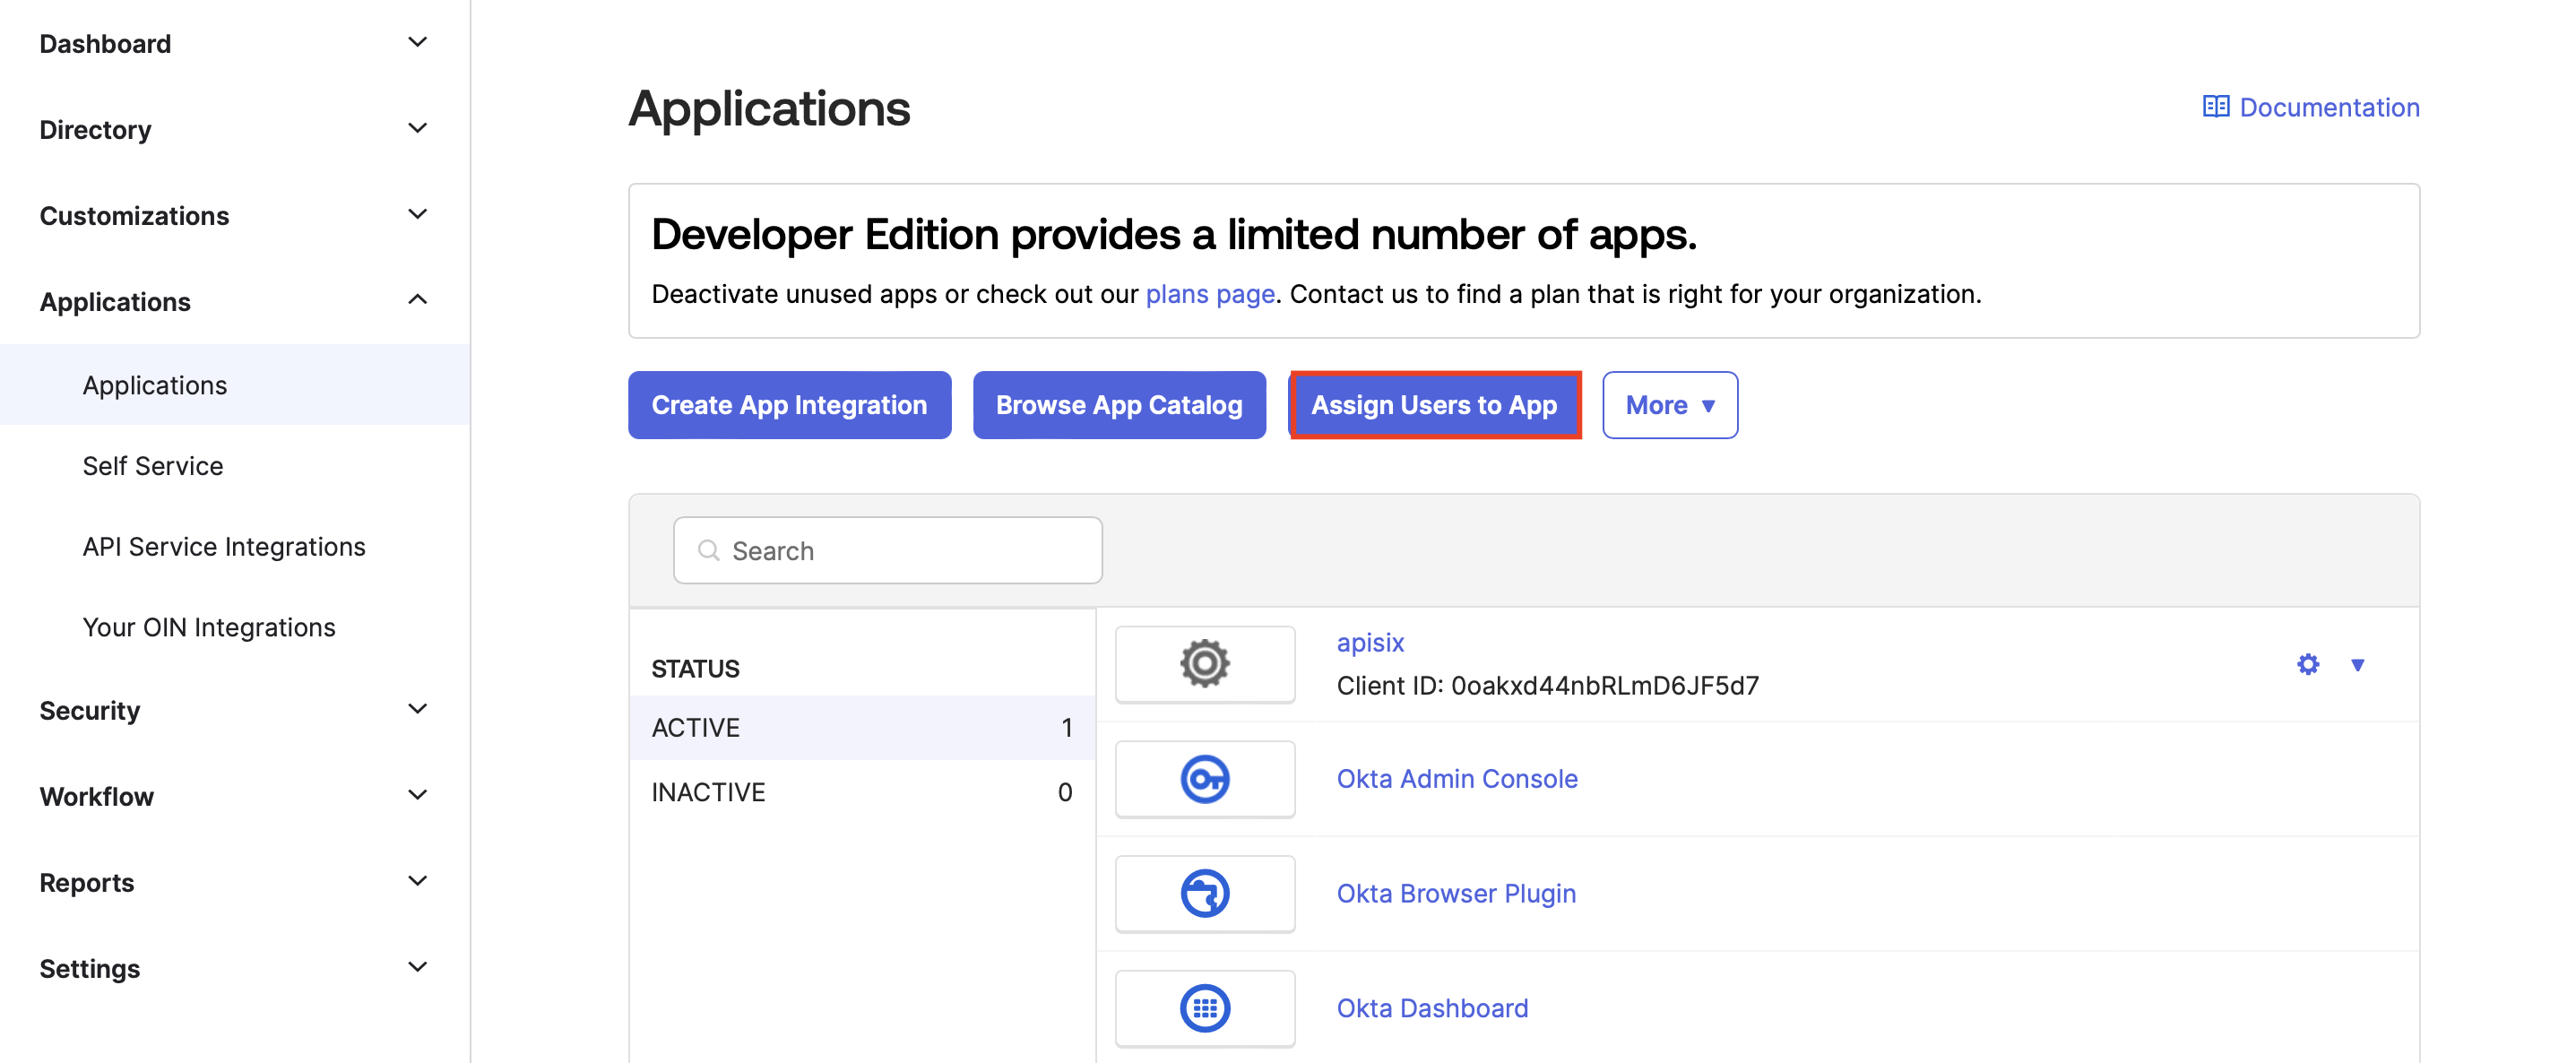
将用户分配给应用程序
仅当你正在实施授权码流时,才完成本节中的步骤。
导航回 Applications 主界面,然后单击 Assign Users to App:
选择应用程序以及要分配的用户,然后单击 Next:

通过确认分配完成:

有关下一步,请参阅配置授权码授予。
创建自定义范围
仅当你正在实施客户端凭证流时,才完成本节中的步骤。
客户端凭证流没有用户上下文,因此你无法请求 openid 范围。相反,创建一个自定义范围。
返回 Applications 主界面,然后点击 Assign Users to App:
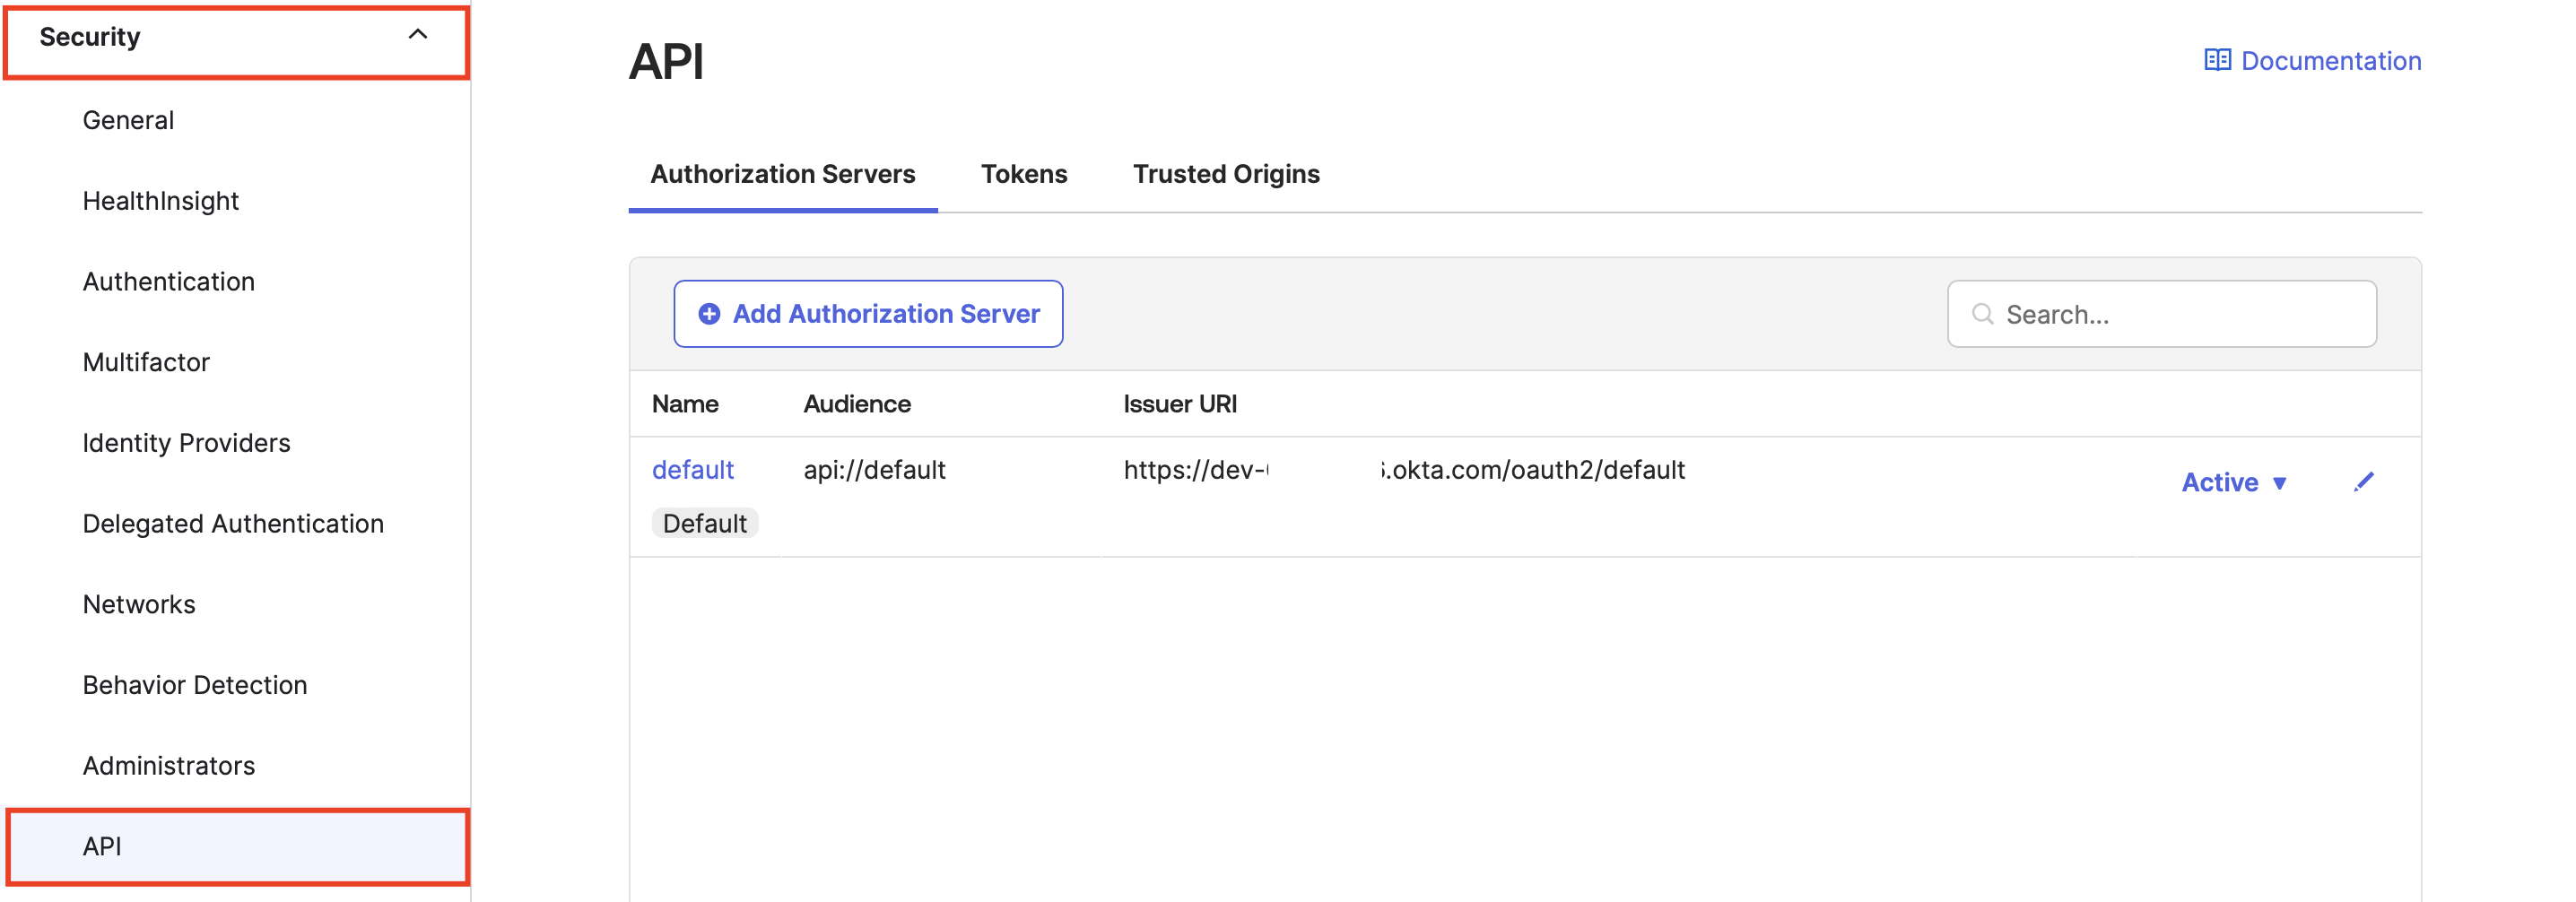
在左侧菜单中,找到 Security 下拉菜单,选择 API,然后单击进入你的授权服务器:
在 Scopes 选项卡下,添加一个新范围:

填写范围名称以及显示短语,然后完成创建范围:

在 Access Policies 选项卡下,添加一个新策略:

填写策略名称、描述以及要分配给的客户端,然后完成创建策略:

创建后,为策略添加规则:

配置规则详细信息。确保选中客户端凭证授予,然后完成创建规则:

有关下一步,请参阅 配置客户端凭证授予。
配置 APISIX
在本节中,你将创建一个带有 OIDC 的路由,该路由将客户端请求转发到 httpbin.org,这是一个公共 HTTP 请求和响应服务。
httpbin.org 的路由 /anything/{anything} 以 JSON 类型返回请求数据中传递的任何内容,例如方法、参数和标头。
配置授权码授予
授权码授予用于 Web 和移动应用程序。该流程从授权服务器在浏览器中显示登录页面开始,用户可以在其中输入凭证。在此过程中,短期授权码将交换为访问Token,APISIX 将其存储在浏览器会话 cookie 中,并将随访问上游资源服务器的每个请求一起发送。
创建路由并启用 openid-connect 插件,如下所示:
- Admin API
- ADC
curl -i "http://127.0.0.1:9180/apisix/admin/routes" -X PUT -d '
{
  "id": "auth-with-oidc",
  "uri":"/anything/*",
  "plugins": {
    "openid-connect": {
      "client_id": "'"$OKTA_CLIENT_ID"'",
      "client_secret": "'"$OKTA_CLIENT_SECRET"'",
      "discovery": "https://'"$OKTA_DOMAIN"'/.well-known/openid-configuration",
      "scope": "openid profile",
      "redirect_uri": "http://localhost:9080/anything/callback",
      "bearer_only": false,
      "session": {
        "secret": "f86cf31663a9c9fa0a28c2cc78badef1"
      }
    }
  },
  "upstream":{
    "type":"roundrobin",
    "nodes":{
      "httpbin.org:80":1
    }
  }
}'
❶ client_id:Okta 客户端 ID。
❷ client_secret:Okta 客户端 secret。
❸ discovery:Okta 发现文档的 URI。
❹ redirect_uri:使用 Okta 身份认证后重定向到的 URI。
❺ bearer_only:对于授权码授予,设置为 false。
❻ session.secret:替换为你用于会话加密和 HMAC 操作的密钥。当 bearer_only 为 false 时为必需。
services:
  - name: httpbin Service
    routes:
      - uris:
          - /anything/*
        name: auth-with-oidc
        plugins:
          openid-connect:
            client_id: '0oakxd44nbRLmD6JF5d7'
            client_secret: 'h4B_dqp_QnIIzZiDG9MSM_tr4QJJkuEj8CF8iw9jGaBak7m60cArKdsHPf'
            discovery: 'https://dev-xxxxxxxx.okta.com/.well-known/openid-configuration'
            scope: openid profile
            redirect_uri: 'http://localhost:9080/anything/callback'
            bearer_only: false
            session:
              secret: 'f86cf31663a9c9fa0a28c2cc78badef1'
    upstream:
      type: roundrobin
      nodes:
        - host: httpbin.org
          port: 80
          weight: 1
❶ client_id:Okta 客户端 ID。
❷ client_secret:Okta 客户端 secret。
❸ discovery:Okta 发现文档的 URI。
❹ redirect_uri:使用 Okta 身份认证后重�定向到的 URI。
❺ bearer_only:对于授权码授予,设置为 false。
❻ session.secret:替换为你用于会话加密和 HMAC 操作的密钥。当 bearer_only 为 false 时为必需。
将配置同步到 APISIX:
adc sync -f adc.yaml
验证
在浏览器中导航到 http://localhost:9080/anything/test。你应该被重定向到 Okta 的登录页面:

使用你的凭证登录。如果成功,请求将被转发到 httpbin.org,你应该看到类似以下的响应:
{
  "args": {},
  "data": "",
  "files": {},
  "form": {},
  "headers": {
    "Accept": "text/html..."
    ...
  },
  "json": null,
  "method": "GET",
  "origin": "127.0.0.1, 59.71.xxx.xxx",
  "url": "http://127.0.0.1/anything/test"
}
配置客户端凭证授予
客户端凭证授予涉及机器对机器 (M2M) 应用程序在没有用户参与的情况下与服务交换凭证。
创建路由并启用 openid-connect 插件,如下所示:
- Admin API
- ADC
curl -i "http://127.0.0.1:9180/apisix/admin/routes" -X PUT -d '
{
  "id": "auth-with-oidc",
  "uri":"/anything/*",
  "plugins": {
    "openid-connect": {
      "client_id": "'"$OKTA_CLIENT_ID"'",
      "client_secret": "'"$OKTA_CLIENT_SECRET"'",
      "discovery": "https://'"$OKTA_DOMAIN"'/oauth2/'"$OKTA_AUTH_SERVER"'/.well-known/openid-configuration",
      "scope": "openid profile apisix",
      "redirect_uri": "http://localhost:9080/anything/callback",
      "bearer_only": false,
      "session": {
        "secret": "f86cf31663a9c9fa0a28c2cc78badef1"
      },
      "use_jwks": true
    }
  },
  "upstream":{
    "type":"roundrobin",
    "nodes":{
      "httpbin.org:80":1
    }
  }
}'
❶ use_jwks:使用 JWKS 端点验证Token。
services:
  - name: httpbin Service
    routes:
      - uris:
          - /anything/*
        name: auth-with-oidc
        plugins:
          openid-connect:
            client_id: '0oakxd44nbRLmD6JF5d7'
            client_secret: 'h4B_dqp_QnIIzZiDG9MSM_tr4QJJkuEj8CF8iw9jGaBak7m60cArKdsHPf'
            discovery: 'https://dev-xxxxxxxx-admin.okta.com/oauth2/default/.well-known/openid-configuration'
            scope: openid profile apisix
            redirect_uri: 'http://localhost:9080/anything/callback'
            bearer_only: false
            session:
              secret: 'f86cf31663a9c9fa0a28c2cc78badef1'
            use_jwks: true
    upstream:
      type: roundrobin
      nodes:
        - host: httpbin.org
          port: 80
          weight: 1
❶ use_jwks:使用 JWKS 端点验证Token。
将配置同步到 APISIX:
adc sync -f adc.yaml
获取访问 Token
将配置应用到你的集群:
获取应用程序的访问Token:
curl "https://dev-02213846-admin.okta.com/oauth2/default/v1/token" -X POST \
  -H 'accept: application/json' \
  -H 'authorization: Basic MG9ha3hkNDRuYlJMbUQ2SkY1ZDc6cTRCX2RxcF9RbklJefwwJTVNNX3RyNFFKSmttdUVqOEhOM2xzQ0Y4aXc5UEdhQmFmN202MGNBcktkc0hQZg==' \
  -H 'cache-control: no-cache' \
  -H 'content-type: application/x-www-form-urlencoded' \
  --data 'grant_type=client_credentials&scope=apisix'
❶ 替换为你包含客户端 ID 和客户端 secret 的 base64 编码字符串。
❷ 根据你的配置调整范围。
你应该看到类似以下的响应:
{
  "token_type":"Bearer",
  "expires_in":3600,
  "access_token":"eyJraWQiOiJTYko2dGFzUmwtOGVZaFBtQmY4TERXcjYtczJwNG9vRXNZSVZzSGNUUHFNIiwiYWxnIjoiUlMyNTYifQ.eyJ2ZXIiOjEsImp0aSI6IkFULm1ya1VTd1lyV1VmbHpQcnZoTEV6OXNXMTVSejBvUWtRVjMzSTkzUDVGLWsiLCJpc3MiOiJodHRwczovL2Rldi0wMjIxMzg0Ni5va9vYXV0aDIvZGVmYXVsdCIsImF1ZCI6ImFwaTovL2RlZmF1bHQiLCJpYXQiOjE3MzA5Njc3MTgsImV4Dk3MTMxOCwiY2lkIjoiMG9ha3hkNDRuYlJMbUQ2SkY1ZDciLCJzY3AiOlsiYXBpc2l4Il0sInN1YiI6IjBvYWt4ZDQ0bmJSTG1ENkpGNWQ3In0.PYndg75QRIr4N4kfLXCmlNX3IdzsF-qYYQuYZQPS0QqT21G6AT5eM1idgiEhn6shRKhWkpXLEQTL0mZn6sbgU1S00R5TYHrDzR-tKIhTnoNeJ3aAjduqadoQnQLJk20LQ58NRWb33fN0i9f51NLRs5zQPZbWDNNl1g6s4XE1wirlU_Ol60Gx-cFgbMyrfs4eJW2-q5AS6mtjPz1blS9sOL4KLbWkU0-HkWc-QAv7Dx05Dmat8lT-NvKbIbFq21DlV5BKCL44k55oPrhZSAfkP0494ab8TEsOhCgo8dT0GGYe9219B3rBMDG2aL0jh1OdeZ8coD2haPeA",
  "scope":"apisix"
}
将访问Token保存到环境变量:
# replace with your access token
export ACCESS_TOKEN="eyJraWQiOiJTYko2dGFzUmwtOGVZaFBtQmY4TERXcjYtczJwNG9vRXNZSVZzSGNUUHFNIiwiYWxnIjoiUlMyNTYifQ.eyJ2ZXIiOjEsImp0aSI6IkFULm1ya1VTd1lyV1VmbHpQcnZoTEV6OXNXMTVSejBvUWtRVjMzSTkzUDVGLWsiLCJpc3MiOiJodHRwczovL2Rldi0wMjIxMzg0Ni5va9vYXV0aDIvZGVmYXVsdCIsImF1ZCI6ImFwaTovL2RlZmF1bHQiLCJpYXQiOjE3MzA5Njc3MTgsImV4Dk3MTMxOCwiY2lkIjoiMG9ha3hkNDRuYlJMbUQ2SkY1ZDciLCJzY3AiOlsiYXBpc2l4Il0sInN1YiI6IjBvYWt4ZDQ0bmJSTG1ENkpGNWQ3In0.PYndg75QRIr4N4kfLXCmlNX3IdzsF-qYYQuYZQPS0QqT21G6AT5eM1idgiEhn6shRKhWkpXLEQTL0mZn6sbgU1S00R5TYHrDzR-tKIhTnoNeJ3aAjduqadoQnQLJk20LQ58NRWb33fN0i9f51NLRs5zQPZbWDNNl1g6s4XE1wirlU_Ol60Gx-cFgbMyrfs4eJW2-q5AS6mtjPz1blS9sOL4KLbWkU0-HkWc-QAv7Dx05Dmat8lT-NvKbIbFq21DlV5BKCL44k55oPrhZSAfkP0494ab8TEsOhCgo8dT0GGYe9219B3rBMDG2aL0jh1OdeZ8coD2haPeA"
验证
使用有效访问Token向路由发送请求:
curl -i "http://127.0.0.1:9080/anything/test" -H "Authorization: Bearer $ACCESS_TOKEN"
你应该收到 HTTP/1.1 200 OK 响应。
使用无效访问Token向路由发送请求:
curl -i "http://127.0.0.1:9080/anything/test" -H "Authorization: Bearer invalid_token"
你应该收到 HTTP/1.1 401 Unauthorized 响应。
下一步
APISIX 支持与许多其他 OIDC 身份提供商集成,例如 Keycloak、Authgear、Microsoft Entra ID (Azure AD) 和 Google。