在 APISIX 中使用 Wasm 插件
APISIX 支持按照 Proxy-Wasm 规范 开发的 WebAssembly (Wasm) 插件,该规范将 Wasm 功能扩展到代理。
使用 Wasm 开发 APISIX 插件有几个好处:
- 能够将许多编程语言编译为 Wasm。这允许你在开发 APISIX 插件时利用现有技术栈的功能。
- 在 APISIX 内本机运行 Wasm 插件,但在单独的 VM 中运行。即使插件崩溃,APISIX 也可以继续运行。
- APISIX 对 Wasm 的持续支持。这避免了维护针对不同编程语言的多个外部插件运行器。
本指南将帮助你了解 APISIX 如何支持 Wasm,以及如何使用 Proxy-Wasm Go SDK 在 Go 中开发示例 Wasm 插件,并将插件加载到 APISIX 中。
APISIX 如何支持 Wasm
APISIX 实现了 Proxy-Wasm 规范。该规范最初是为 Envoy 代理开发的,后来发展成为为代理编写 Wasm 插件的标准。任何使用 Proxy-Wasm SDK 编写的插件都可以在 APISIX 中运行。
APISIX 使用以下编程模型来处理 Wasm 插件。在编写自定义 Wasm 插件时,应实现所有这些接口。
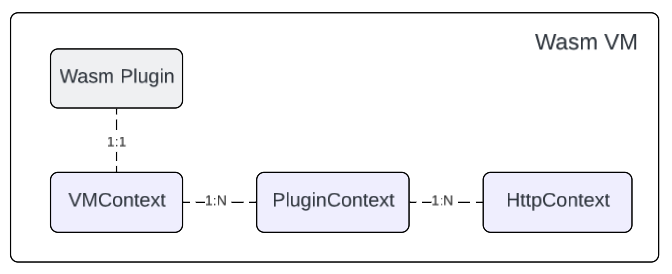
每个插件都有自己的 VMContext,它可以为每条路由创建多个 PluginContext。例如,每个 PluginContext 对应于一个插件实例,因此如果服务配置了 Wasm 插件并且两个路由继承自该服务,则每个路由都将拥有自己的 PluginContext。
同样,一个 PluginContext 是多个 HTTPContext 的父级。每个命中配置的 HTTP 请求也将拥有自己的 HttpContext。例如,如果你同时配置了全局规则和路由,则 HTTP 请求将具有两个 HTTPContext,一个用于来自全局规则的 PluginContext,另一个用于来自路由的 PluginContext。
构建并将 Wasm 插件加载到 APISIX
在本节中,你将学习如何在 Go 中构建一个最小的 Wasm 插件,只要有传入请求,该插件就会在代理中记录一条警告消息,将源代码编译为 Wasm,并将 Wasm 插件加载到 APISIX 中。
前置条件
- 安装 Docker。
- 安装 cURL 以向服务发送请求进行验证。
- 按照 快速入门教程 在 Docker 或 Kubernetes 中启动一个新的 APISIX 实例。
- 安装 Go。
- 安装 TinyGo 将 Go 源代码编译为 Wasm。
- 安装 Proxy-Wasm Go SDK 以在 Go 中开发符合 Proxy-Wasm 的插件。
- 如果使用 Admin API 示例且启用了身份验证,请将管理员角色的密钥导出为
ADMIN_API_KEY。请在deployment.admin.admin_key下配置该密钥。Docker 快速入门为了便于本地评估而禁用了身份验证;生产环境中请保持启用。
用 Go 编写插件逻辑
创建一个包含以下代码的文件:
package main

// Import the proxy-wasm-go-sdk package for building Wasm plugins
import (
    "github.com/tetratelabs/proxy-wasm-go-sdk/proxywasm"
    "github.com/tetratelabs/proxy-wasm-go-sdk/proxywasm/types"
)

func main() {
    // Set the VM context to a new instance of the vmContext struct
    proxywasm.SetVMContext(&vmContext{})
}

// The vmContext struct represents the VM context
type vmContext struct {
    // Embed the DefaultVMContext type from the proxywasm/types package
    types.DefaultVMContext
}

// The NewPluginContext function is called when a new plugin context is created
func (*vmContext) NewPluginContext(contextID uint32) types.PluginContext {
    // Return a new instance of the pluginContext struct with the given contextID
    return &pluginContext{contextID: contextID}
}

// The pluginContext struct represents the plugin context
type pluginContext struct {
    // Embed the DefaultPluginContext type from the proxywasm/types package
    types.DefaultPluginContext
    conf      string
    contextID uint32
}

// The OnPluginStart function is called when the plugin is started
func (ctx *pluginContext) OnPluginStart(pluginConfigurationSize int) types.OnPluginStartStatus {
    // Get the plugin configuration data
    data, err := proxywasm.GetPluginConfiguration()
    if err!= nil {
        // Log a critical error if there's an error reading the configuration
        proxywasm.LogCriticalf("error reading plugin configuration: %v", err)
        return types.OnPluginStartStatusFailed
    }
    // Store the configuration data in the conf field
    ctx.conf = string(data)
    // Return a successful status
    return types.OnPluginStartStatusOK
}

// The OnPluginDone function is called when the plugin is done
func (ctx *pluginContext) OnPluginDone() bool {
    proxywasm.LogInfo("do clean up...")
    return true
}

// The NewHttpContext function is called when a new HTTP context is created
func (ctx *pluginContext) NewHttpContext(contextID uint32) types.HttpContext {
    // Return a new instance of the httpLifecycle struct with the given contextID and conf
    return &httpLifecycle{
        pluginCtxID: ctx.contextID,
        conf: ctx.conf,
        contextID: contextID,
    }
}

// The httpLifecycle struct represents the HTTP lifecycle
type httpLifecycle struct {
    // Embed the DefaultHttpContext type from the proxywasm/types package
    types.DefaultHttpContext
    pluginCtxID uint32
    contextID   uint32
    conf        string
}

// The OnHttpRequestHeaders function is called when HTTP request headers are received
func (ctx *httpLifecycle) OnHttpRequestHeaders(numHeaders int, endOfStream bool) types.Action {
    // Log a warning message with the plugin context ID, configuration, and HTTP context ID
    proxywasm.LogWarnf("run plugin ctx %d with conf %s in http ctx %d", ctx.pluginCtxID, ctx.conf, ctx.contextID)
    // Return an action to continue processing the request
    return types.ActionContinue
}
上面的代码为 httpLifecycle 结构实现了 OnHttpRequestHeaders 方法。只要收到 HTTP 请求头,就会调用该函数。请参阅 下面的部分 以了解有关 Proxy-Wasm 回调函数与 APISIX 阶段之间相关性的更多信息。
将代码编译为 Wasm
请使用相互兼容的 SDK 与编译器版本。该示例可使用 Go 1.22、TinyGo 0.31.2 和 Proxy-Wasm Go SDK 0.16.0 构建。在新的示例目录中,先初始化 Go 模块,再添加 SDK;如果目录中已有 Go 模块,请保留现有模块:
go mod init apisix-wasm-log
go get github.com/tetratelabs/proxy-wasm-go-sdk@v0.16.0
tinygo build -o log.go.wasm -scheduler=none -target=wasi ./main.go
如果编译成功,你应该在当前目录中看到一个 log.go.wasm 文件。
将插件加载到 APISIX 中
将 log.go.wasm 复制到 /usr/local/bin 目录中:
docker cp log.go.wasm apisix-quickstart:/usr/local/bin/
使用 Wasm 插件相关信息更新 配置文件:
wasm:
  plugins:
    - name: wasm_log
      priority: 7999
      file: /usr/local/bin/log.go.wasm
❶ name:Wasm 插件的名称。
❷ priority:插件的 执行优先级。
❸ file:Wasm 文件的绝对路径。
重新加载 APISIX 以使配置更改生效:
docker exec apisix-quickstart apisix reload
在 APISIX 中使用插件
创建一个带有 wasm_log 插件的示例路由:
- Admin API
- ADC
curl "http://127.0.0.1:9180/apisix/admin/routes" -X PUT \
  -H "X-API-KEY: ${ADMIN_API_KEY}" \
  -d '{
  "id": "wasm-log-plugin",
  "uri": "/anything",
  "plugins": {
    "wasm_log": {
      "conf": "hello apisix"
    }
  },
  "upstream": {
    "type": "roundrobin",
    "nodes": {
      "httpbin.org:80": 1
    }
  }
}'
❶ conf:配置插件要记录的字符串。
services:
  - name: Wasm Plugin Service
    routes:
      - uris:
          - /anything
        name: wasm-log-plugin
        plugins:
          wasm_log:
            conf: hello apisix
    upstream:
      type: roundrobin
      nodes:
        - host: httpbin.org
          port: 80
          weight: 1
❶ conf:配置插件要记录的字符串。
将配置同步到 APISIX:
adc sync -f adc.yaml
向路由发送请求:
curl -i "http://127.0.0.1:9080/anything"
你应该收到 HTTP/1.1 200 OK 响应。
导航到错误日志,你应该看到 wasm_log 插件创建的以下日志条目:
2025/09/04 09:58:54 [warn] 53#53: *3331 run plugin ctx 1 with conf hello apisix in http ctx 2, client: 127.0.0.1, server: _, request: "GET /anything HTTP/1.1", host: "127.0.0.1:9080"
Proxy-Wasm 回调函数和 APISIX 阶段
下表显示了 Proxy-Wasm 回调函数与 APISIX 阶段 之间的对应关系。
| Proxy-Wasm Callbacks | APISIX Phases |
|---|---|
proxy_on_configure | 当新配置没有插件上下文时运行一次,例如当第一个请求到达没有配置 Wasm 插件的路由时。 |
proxy_on_http_request_headers | 在 access 或 rewrite 阶段 运行,具体取决于 http_request_phase 的配置。 |
proxy_on_http_request_body | 在与 proxy_on_http_request_headers 相同的 阶段 运行。要运行此回调,请在 proxy_on_http_request_headers 中将属性 wasm_process_req_body 设置为非空值。 |
proxy_on_http_response_headers | 在 header_filter 阶段运行。 |
proxy_on_http_response_body | 在 body_filter 阶段 运行。要运行此回调,请在 proxy_on_http_response_headers 中将属性 wasm_process_resp_body 设置为非空值。 |
下一步
对 Proxy-Wasm API 的支持是一项持续的工作。要关注最新进展,请查看 wasm-nginx-module。
一些 APISIX 插件(例如 fault-injection 和 response-rewrite)已有 Wasm 实现。浏览 /t/wasm 目录以了解更多信息。
一个实际用例是将 APISIX 与 Coraza WAF 集成以保护上游资源。这是通过将 coraza-proxy-wasm 模块加载到 APISIX 中并在 APISIX 资源上配置插件来完成的。请参阅 与 Coraza WAF 集成 文档。