使用 Docker Compose 部署
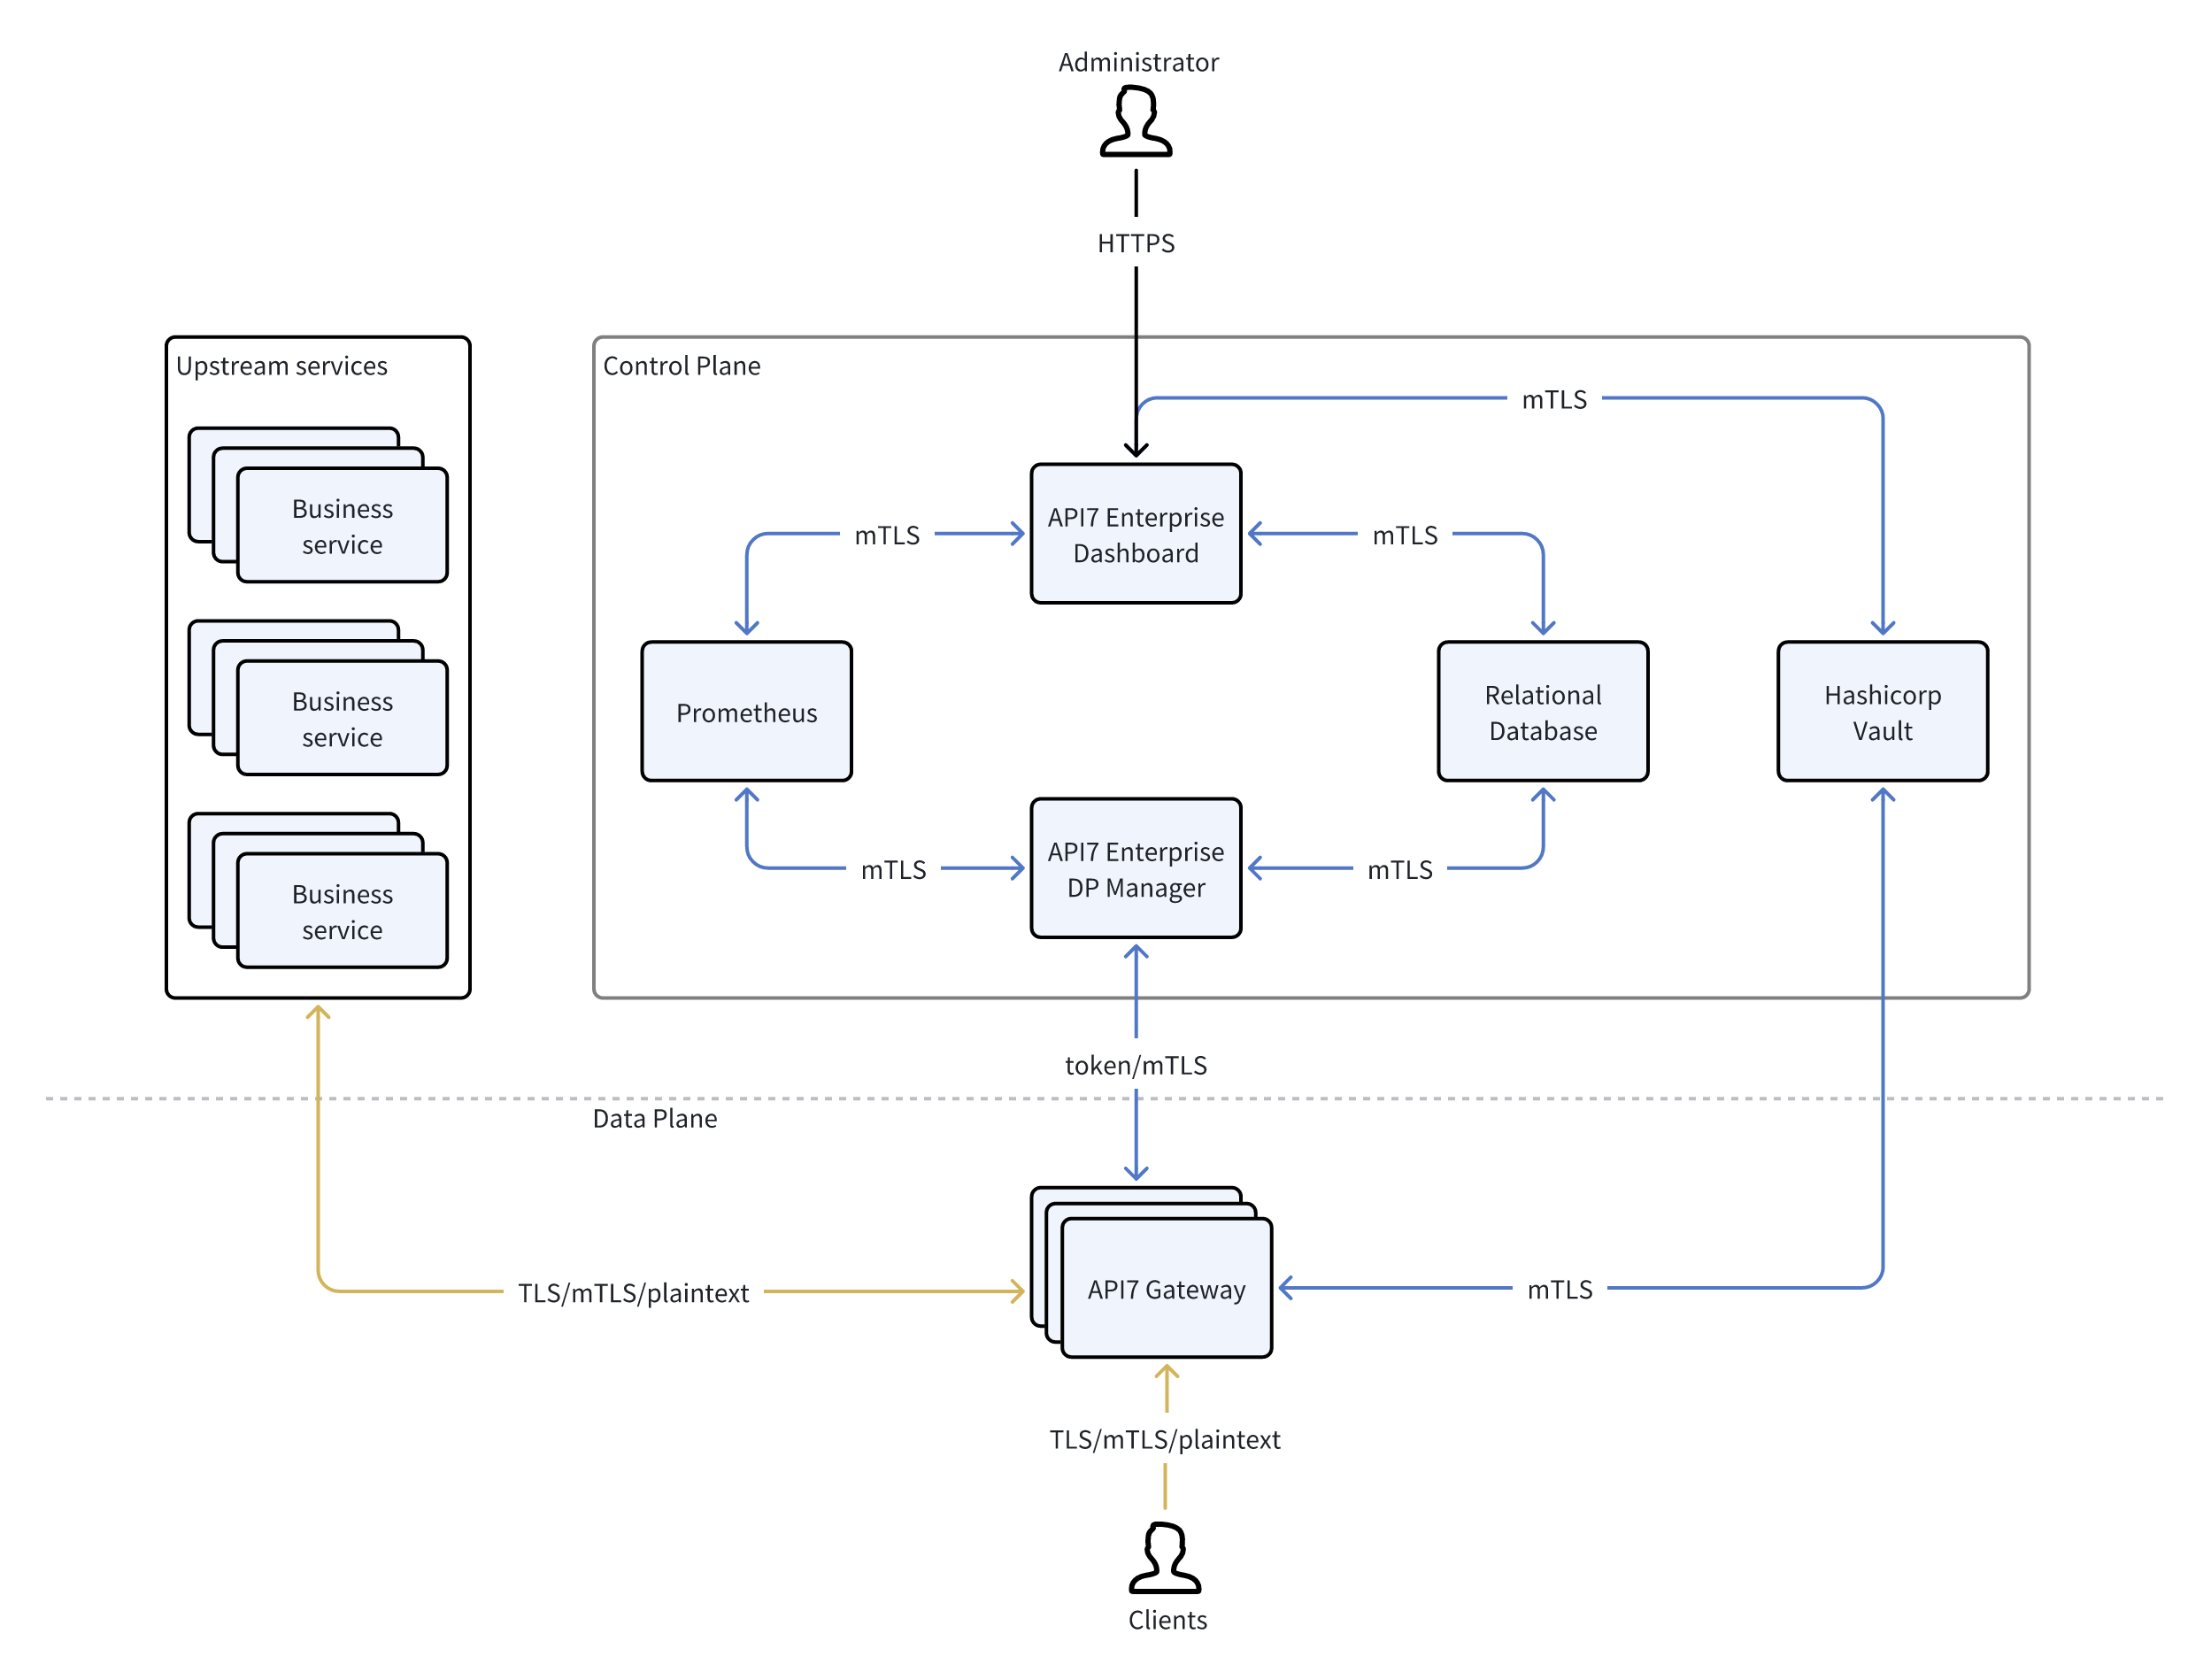
本指南将引导你了解如何使用 Docker Compose 部署 API7 企业版控制面和数据面。
先决条件
- 安装 Docker Compose。
PostgreSQL(可选)
如果使用外部 PostgreSQL,请跳过此部分。
在你希望部署 PostgreSQL 的主机上,创建一个 Compose 文件:
name: postgresql

services:
  postgresql:
    image: bitnami/postgresql:15.3.0-debian-11-r0
    hostname: postgresql
    user: root
    volumes:
      - ./postgresql_data:/bitnami/postgresql
    healthcheck:
      test: ["CMD", "pg_isready", "-U", "api7ee"]
      interval: 10s
      timeout: 10s
      retries: 3
      start_period: 10s
    environment:
      POSTGRES_USER: api7ee
      POSTGRES_PASSWORD: changeme
    ports:
      - "5432:5432"

volumes:
  postgresql_data:
    driver: local
❶ 将主机上的 ./postgresql_data 目录映射到容器中的 /bitnami/postgresql 目录。请勿更改或删除此目录的内容。
❷ 配置 PostgreSQL 用户名。
❸ 配置 PostgreSQL 密码。请更新密码以用于生产环境。
启动容器:
docker compose -f postgresql.yaml up -d
假设当前 PostgreSQL 服务器的 IP 是 192.168.31.10。你现在应该能够连接到服务器 192.168.31.10:5432。
Prometheus(可选)
如果使用外部 Prometheus,请��跳过此部分。
在你希望部署 Prometheus 的主机上,创建一个 Compose 文件:
name: prometheus

services:
  prometheus:
    image: bitnami/prometheus:2.44.0-debian-11-r7
    hostname: prometheus
    user: root
    volumes:
      - ./prometheus_data:/opt/bitnami/prometheus/data
    command:
      - --config.file=/opt/bitnami/prometheus/conf/prometheus.yml
      - --web.enable-remote-write-receiver
    healthcheck:
      test: ["CMD", "/opt/bitnami/prometheus/bin/promtool", "check", "healthy"]
      interval: 10s
      timeout: 10s
      retries: 3
      start_period: 10s
    ports:
      - "9090:9090"
❶ 将主机上的 ./prometheus_data 目录映射到容器中的 /opt/bitnami/prometheus/data 目录。请勿更改或删除此目录的内容。
启动容器:
docker compose -f prometheus.yaml up -d
假设当前 Prometheus 服务器 IP 为 192.168.31.11。你现在应该能够连接到服务器 192.168.31.11:9090。
部署 API7
在本节中,你将创建两个配置文件,一个用于控制面,另一个用于数据面,并在启动 API7 企业版时将它们挂载。
在你希望部署 API7 企业版的主机上,为控制面创建一个配置文件:
server:
  listen:
    disable: true
    host: "0.0.0.0"
    port: 7080
  tls:
    disable: false
    host: "0.0.0.0"
    port: 7443
    key_file: ""
    cert_file: ""
  status:
    disable: false
    host: "127.0.0.1"
    port: 7081

log:
  level: warn
  output: stderr

database:
  dsn: "postgres://api7ee:changeme@192.168.31.10:5432/api7ee"

session_options_config:
  same_site: "lax"  # means the value SameSiteLaxMode
  secure: false
  max_age: 86400

prometheus:
  addr: "http://192.168.31.11:9090"
  whitelist:
    - "/api/v1/query_range"
    - "/api/v1/query"
    - "/api/v1/format_query"
    - "/api/v1/series"
    - "/api/v1/labels"
    - "/api/v1/labels/.*/values"
  # basic_auth: # access the prometheus with basic-auth
  #   username: "" # Basic-auth username. If the username is empty, basic-auth authentication is not performed when requesting prometheus.
  #   password: ""
  # tls:
  #   server_name: ""
  #   insecure_skip_verify: false
  #   enable_client_cert: false
  #   key_file: ""  # the file path of the private key for requesting prometheus, (e.g. /app/prometheus/certs/tls.key)
  #   cert_file: "" # the file path of the certificate for requesting prometheus, (e.g. /app/prometheus/certs/tls.crt)
  #   ca_file: ""   # the file path of the ca to verify the prometheus tls server. (e.g. /app/prometheus/certs/ca.crt)

consumer_proxy:
  enable: false
  cache_success_count: 512
  cache_success_ttl: 60
  cache_failure_count: 512
  cache_failure_ttl: 60
❶ 配置 PostgreSQL 连接信息。
❷ 配置 Prometheus 连接信息。
在你希望部署 API7 企业版的主机上,为数据面创建一个配置文件:
server:
  listen:
    host: "0.0.0.0"
    port: 7900
  tls:
    host: "0.0.0.0"
    port: 7943
  status:
    disable: false
    host: "127.0.0.1"
    port: 7901

log:
  level: warn
  output: stderr

database:
  dsn: "postgres://api7ee:changeme@192.168.31.10:5432/api7ee"

prometheus:
  addr: "http://192.168.31.11:9090"
  # basic_auth: # access the prometheus with basic-auth
  #   username: "" # Basic-auth username. If the username is empty, basic-auth authentication is not performed when requesting prometheus.
  #   password: ""
  # tls:
  #   server_name: ""
  #   insecure_skip_verify: false
  #   enable_client_cert: false
  #   key_file: ""  # the file path of the private key for requesting prometheus, (e.g. /app/prometheus/certs/tls.key)
  #   cert_file: "" # the file path of the certificate for requesting prometheus, (e.g. /app/prometheus/certs/tls.crt)
  #   ca_file: ""   # the file path of the ca to verify the prometheus tls server. (e.g. /app/prometheus/certs/ca.crt)

rate_limit:
  enable: false
  time_window: 1 # unit: second
  count: 1000
❶ 配置 PostgreSQL 连接信息。
❷ 配置 Prometheus 连接信息。
创建一个 Compose 文件:
name: api7

services:
  api7-ee-dashboard:
    image: api7/api7-ee-3-integrated:v3.2.16.4
    hostname: dashboard
    restart: always
    volumes:
      - ./dashboard_conf/conf.yaml:/usr/local/api7/conf/conf.yaml:ro
    command:
      - sh
      - -c
      - node server.js & /usr/local/api7/api7-ee-dashboard -c /usr/local/api7/conf/conf.yaml
    ports:
      - "7080:7080"
      - "7443:7443"
    healthcheck:
      test: ["CMD", "nc", "-z", "127.0.0.1", "7443"]
      interval: 10s
      timeout: 5s
      retries: 12

  api7-ee-dp-manager:
    image: api7/api7-ee-dp-manager:v3.2.16.4
    hostname: dp-manager
    restart: always
    volumes:
      - ./dp_manager_conf/conf.yaml:/usr/local/api7/conf/conf.yaml:ro
    command:
      - /usr/local/api7/api7-ee-dp-manager
      - -c
      - /usr/local/api7/conf/conf.yaml
    ports:
      - "7900:7900"
      - "7943:7943"
启动 API7 企业版:
docker compose -f api7.yaml up -d
假设当前 API7 企业版服务器 IP 为 192.168.31.12。现在你应该可以在 https://192.168.31.12:7443 访问控制台,在 https://192.168.31.12:7943 访问控制面。
部署网关之前,应该在控制台上先手动填写控制面地址,以确保生成的部署脚本是正确的。要找到控制面地址配置,请转到控制台上的 Organization > Settings > Gateway Settings > Deployment。
高可用性
API7 的控制台和 DP Manager 都是无状态服务,可以在多台虚拟机上复制为多个实例,并通过前端负载均衡器暴露服务,从而实现高可用性。
有关更多信息,请参阅 API7 高可用性。
网关
参阅添加网关实例了解如何添加新的网关实例。