acl
acl 插件通过将经过身份验证的消费者或外部用户标签与允许列表或拒绝列表进行匹配,对请求进行授权。它支持自定义拒绝响应,并可从扁平或嵌套数据中提取标签。
消费者标签策略适用于 APISIX 和 API7 Gateway。是否支持外部用户取决于身份验证插件。本页的 Keycloak OIDC 示例仅适用于 API7 Gateway,因为 APISIX 3.18 的 openid-connect 插件不会向 acl 提供 OIDC 用户信息。
示例
以下示例说明如何根据消费者标签进行授权,以及 API7 Gateway 如何根据身份提供商返回的用户组信息进行授权。
根据消费者标签控制访问
以下示例使用 key-auth 对两个消费者进行身份验证。acl 插件只允许 org 标签包含 opensource 的消费者访问。
- Admin API
- ADC
- Ingress Controller
创建具有所需组织标签的消费者 john:
curl "http://127.0.0.1:9180/apisix/admin/consumers" -X PUT \
  -H "X-API-KEY: ${ADMIN_API_KEY}" \
  -d '{
    "username": "john",
    "labels": {
      "org": "[\"opensource\",\"apache\"]",
      "project": "[\"tomcat\",\"web-server\",\"http,server\"]"
    }
  }'
创建具有不同标签的消费者 jane:
curl "http://127.0.0.1:9180/apisix/admin/consumers" -X PUT \
  -H "X-API-KEY: ${ADMIN_API_KEY}" \
  -d '{
    "username": "jane",
    "labels": {
      "org": "apache",
      "project": "gateway,apisix,web-server"
    }
  }'
为 john 创建 key-auth 凭证:
curl "http://127.0.0.1:9180/apisix/admin/consumers/john/credentials" -X PUT \
  -H "X-API-KEY: ${ADMIN_API_KEY}" \
  -d '{
    "id": "cred-john-key-auth",
    "plugins": {
      "key-auth": {
        "key": "john-key"
      }
    }
  }'
为 jane 创建单独的凭证:
curl "http://127.0.0.1:9180/apisix/admin/consumers/jane/credentials" -X PUT \
  -H "X-API-KEY: ${ADMIN_API_KEY}" \
  -d '{
    "id": "cred-jane-key-auth",
    "plugins": {
      "key-auth": {
        "key": "jane-key"
      }
    }
  }'
消费者标签值可以是标量、逗号分隔的字符串,或编码为字符串的 JSON 数组。创建一条路由,允许 org 标签包含 opensource 的消费者访问:
curl "http://127.0.0.1:9180/apisix/admin/routes/acl-consumer-labels" -X PUT \
  -H "X-API-KEY: ${ADMIN_API_KEY}" \
  -d '{
    "uri": "/get",
    "plugins": {
      "key-auth": {},
      "acl": {
        "allow_labels": {
          "org": ["opensource"]
        }
      }
    },
    "upstream": {
      "type": "roundrobin",
      "nodes": {
        "httpbin.org:80": 1
      }
    }
  }'
❶ 当经过身份验证的消费者具有值匹配 opensource 的 org 标签时,允许请求。
将带标签的消费者、其凭证以及受保护服务添加到部署使用的完整期望状态文件中:
consumers:
  - username: john
    labels:
      docs-example: acl-consumer-labels
      org: "[\"opensource\",\"apache\"]"
      project: "[\"tomcat\",\"web-server\",\"http,server\"]"
    credentials:
      - name: cred-john-key-auth
        type: key-auth
        config:
          key: john-key
  - username: jane
    labels:
      docs-example: acl-consumer-labels
      org: apache
      project: gateway,apisix,web-server
    credentials:
      - name: cred-jane-key-auth
        type: key-auth
        config:
          key: jane-key
services:
  - name: acl-consumer-labels
    labels:
      docs-example: acl-consumer-labels
    routes:
      - name: acl-consumer-labels
        uris:
          - /get
        plugins:
          key-auth: {}
          acl:
            allow_labels:
              org:
                - opensource
    upstream:
      type: roundrobin
      nodes:
        - host: httpbin.org
          port: 80
          weight: 1
❶ 当经过身份验证的消费者具有值匹配 opensource 的 org 标签时,允许请求。
ADC 会将选定的资源类型按期望状态进行协调。预览此示例所管理的变更,并确认差异中没有意外的更新或删除:
adc diff -f adc.yaml \
  --include-resource-type service \
  --include-resource-type consumer \
  --label-selector docs-example=acl-consumer-labels
同步已检查的服务和消费者,包括其嵌套凭证:
adc sync -f adc.yaml \
  --include-resource-type service \
  --include-resource-type consumer \
  --label-selector docs-example=acl-consumer-labels
- Gateway API
- APISIX CRD
创建两个带标签的消费者,并通过 PluginConfig 附加身份验证和 ACL 插件:
apiVersion: apisix.apache.org/v1alpha1
kind: Consumer
metadata:
  namespace: aic
  name: john
  labels:
    org: opensource
spec:
  gatewayRef:
    name: apisix
  credentials:
    - type: key-auth
      name: cred-john-key-auth
      config:
        key: john-key
---
apiVersion: apisix.apache.org/v1alpha1
kind: Consumer
metadata:
  namespace: aic
  name: jane
  labels:
    org: apache
spec:
  gatewayRef:
    name: apisix
  credentials:
    - type: key-auth
      name: cred-jane-key-auth
      config:
        key: jane-key
---
apiVersion: v1
kind: Service
metadata:
  namespace: aic
  name: httpbin-external-domain
spec:
  type: ExternalName
  externalName: httpbin.org
---
apiVersion: apisix.apache.org/v1alpha1
kind: PluginConfig
metadata:
  namespace: aic
  name: acl-consumer-labels
spec:
  plugins:
    - name: key-auth
      config: {}
    - name: acl
      config:
        allow_labels:
          org:
            - opensource
---
apiVersion: gateway.networking.k8s.io/v1
kind: HTTPRoute
metadata:
  namespace: aic
  name: acl-consumer-labels
spec:
  parentRefs:
    - name: apisix
  rules:
    - matches:
        - path:
            type: Exact
            value: /get
      filters:
        - type: ExtensionRef
          extensionRef:
            group: apisix.apache.org
            kind: PluginConfig
            name: acl-consumer-labels
      backendRefs:
        - name: httpbin-external-domain
          port: 80
将配置应用到集群:
kubectl apply -f acl-gateway-api.yaml
创建两个带标签的消费者、一个基于域名的上游和一条受保护路由:
apiVersion: apisix.apache.org/v2
kind: ApisixConsumer
metadata:
  namespace: aic
  name: john
  labels:
    org: opensource
spec:
  ingressClassName: apisix
  authParameter:
    keyAuth:
      value:
        key: john-key
---
apiVersion: apisix.apache.org/v2
kind: ApisixConsumer
metadata:
  namespace: aic
  name: jane
  labels:
    org: apache
spec:
  ingressClassName: apisix
  authParameter:
    keyAuth:
      value:
        key: jane-key
---
apiVersion: apisix.apache.org/v2
kind: ApisixUpstream
metadata:
  namespace: aic
  name: httpbin-external-domain
spec:
  ingressClassName: apisix
  externalNodes:
    - type: Domain
      name: httpbin.org
---
apiVersion: apisix.apache.org/v2
kind: ApisixRoute
metadata:
  namespace: aic
  name: acl-consumer-labels
spec:
  ingressClassName: apisix
  http:
    - name: acl-consumer-labels
      match:
        paths:
          - /get
      upstreams:
        - name: httpbin-external-domain
      plugins:
        - name: key-auth
          enable: true
          config: {}
        - name: acl
          enable: true
          config:
            allow_labels:
              org:
                - opensource
将配置应用到集群:
kubectl apply -f acl-apisix-crd.yaml
以消费者 jane 的身份发送请求:
curl -i "http://127.0.0.1:9080/get" -H "apikey: jane-key"
由于 jane 不具有所需标签,响应应为 HTTP/1.1 403 Forbidden。
以消费者 john 的身份发送相同请求:
curl -i "http://127.0.0.1:9080/get" -H "apikey: john-key"
由于 john 具有所需标签,响应应为 HTTP/1.1 200 OK。
根据 OIDC 用户组控制访问
此示例使用 OIDC 用户信息中返回的 Keycloak 用户组,对浏览器请求进行授权。
OIDC 用户信息示例仅适用于 API7 Gateway。其 openid-connect 插件会向 acl 提供经过身份验证的用户信息。APISIX 3.18 不支持这两个插件之间的此项集成。
配置 Keycloak 用户组
按照使用 Keycloak 配置 SSO完成 Keycloak realm、机密 OIDC 客户端和用户设置。保持启用 Authorization Code 和 S256 PKCE,并将 http://localhost:9080/anything/user/callback 注册为有效的重定向 URI。
创建两个用户组并将其分配给测试用户:
- 选择 Groups → Create group,创建
apisix,然后重复该操作创建opensource。 - 选择 Users → quickstart-user → Groups → Join Group。
- 选择
apisix和opensource,然后选择 Join。
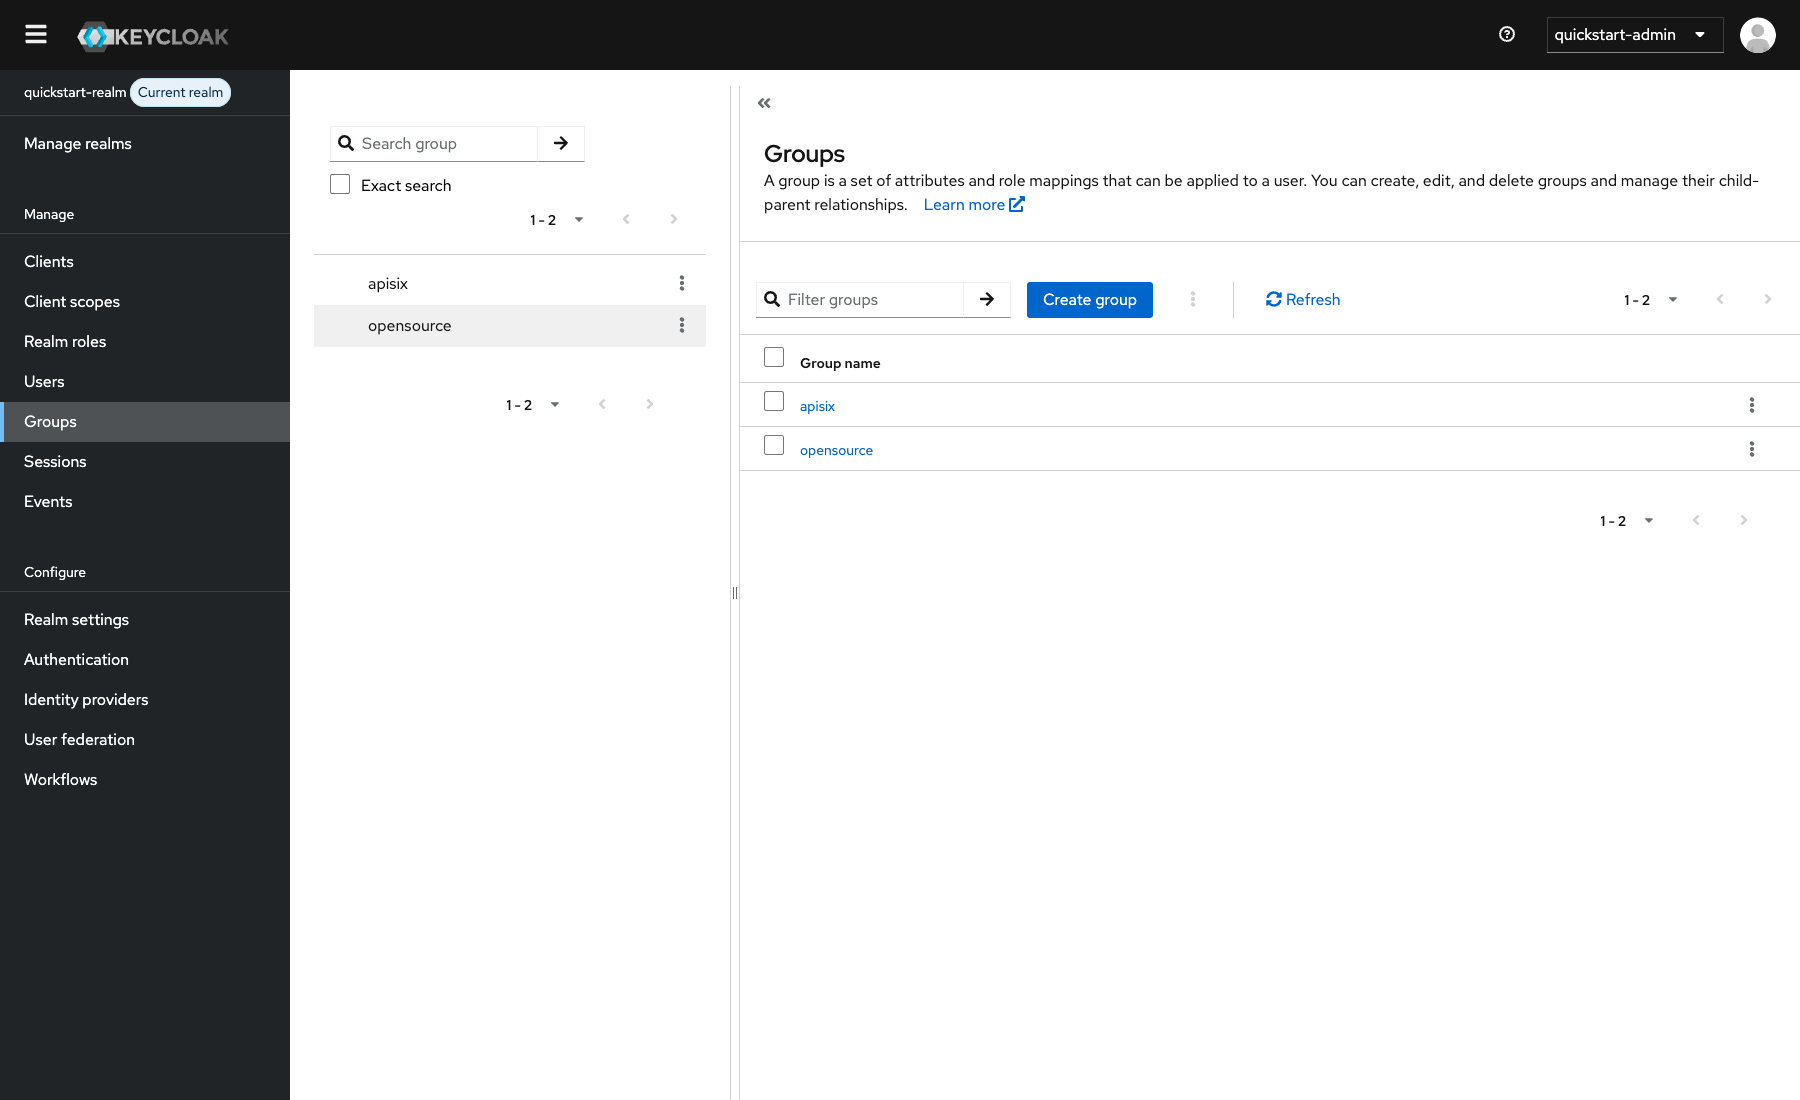
将用户组添加到 OIDC 用户信息中:
-
选择 Clients → apisix-quickstart-client → Client scopes。
-
打开 apisix-quickstart-client-dedicated,选择 Add mapper → By configuration,然后选择 Group Membership。
-
配置以下字段:
字段 值 Name groupsToken Claim Name groupsFull group path 开启 Add to userinfo 开启 -
选择 Save。
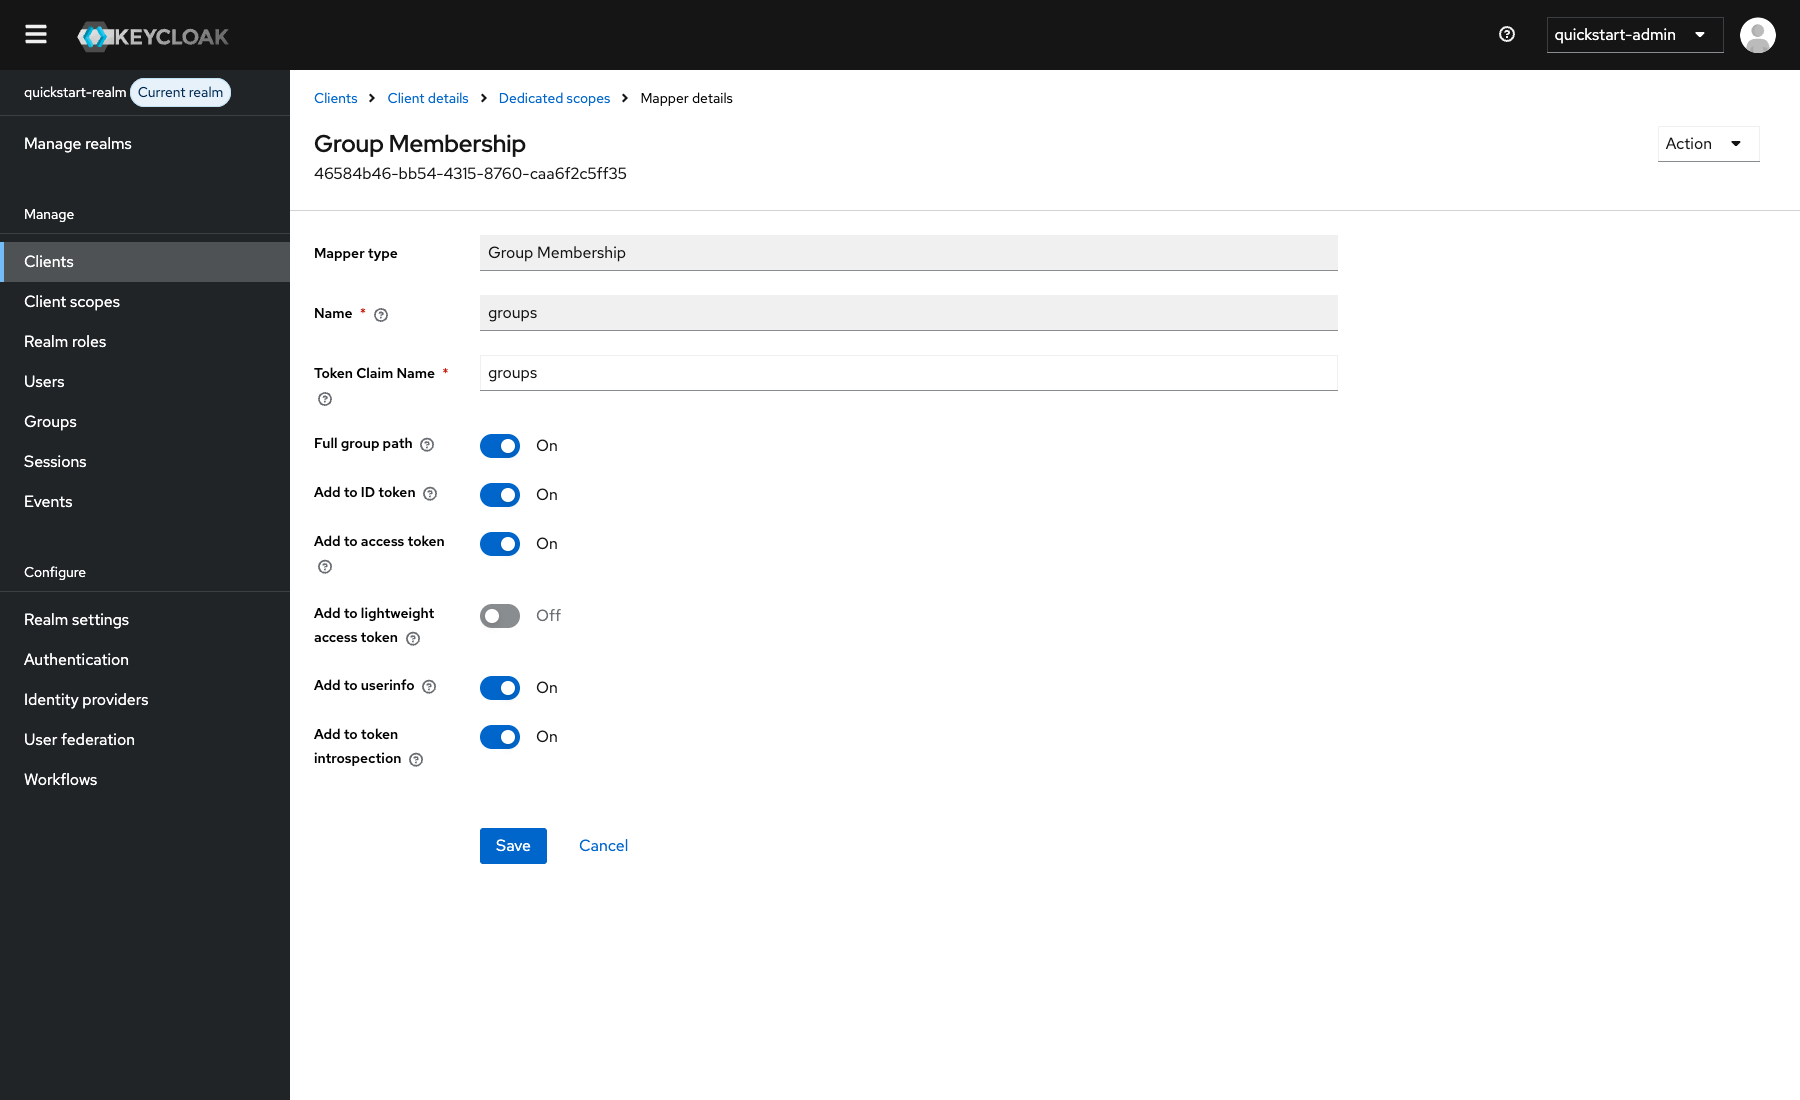
将 Keycloak 客户端详细信息保存为环境变量,并替换示例值:
export KEYCLOAK_HOST=replace-with-keycloak-host
export KEYCLOAK_DISCOVERY="http://${KEYCLOAK_HOST}:8080/realms/quickstart-realm/.well-known/openid-configuration"
export KEYCLOAK_CLIENT_ID=apisix-quickstart-client
export KEYCLOAK_CLIENT_SECRET=replace-with-client-secret
export API7_SESSION_SECRET="$(openssl rand -hex 32)"
网关容器和浏览器必须能够通过同一主机地址访问 Keycloak。在生产部署中,请使用 HTTPS,并将客户端密钥和会话密钥存储在密钥管理系统中。
配置 API7 Gateway
创建一条受保护路由,以启动浏览器身份验证,并允许属于 Keycloak /apisix 用户组的用户访问。
- Admin API
- ADC
- Ingress Controller
通过 Admin API 创建路由:
curl "http://127.0.0.1:9180/apisix/admin/routes/acl-oidc-groups" -X PUT \
  -H "X-API-KEY: ${ADMIN_API_KEY}" \
  -d @- <<EOF
{
  "uri": "/anything/user/*",
  "plugins": {
    "openid-connect": {
      "client_id": "$KEYCLOAK_CLIENT_ID",
      "client_secret": "$KEYCLOAK_CLIENT_SECRET",
      "discovery": "$KEYCLOAK_DISCOVERY",
      "redirect_uri": "http://localhost:9080/anything/user/callback",
      "bearer_only": false,
      "use_pkce": true,
      "scope": "openid profile email",
      "session": {
        "secret": "$API7_SESSION_SECRET"
      },
      "set_access_token_header": false,
      "set_id_token_header": false,
      "set_userinfo_header": false
    },
    "acl": {
      "external_user_label_field": "groups",
      "allow_labels": {
        "groups": ["/apisix"]
      }
    },
    "proxy-rewrite": {
      "headers": {
        "remove": ["Authorization", "Cookie"]
      }
    }
  },
  "upstream": {
    "type": "roundrobin",
    "nodes": {
      "httpbin.org:80": 1
    }
  }
}
EOF
❶ 启动浏览器身份验证,并向 Keycloak 发送 S256 PKCE 质询。
❷ 从 Keycloak 返回的 OIDC 用户信息中读取 groups 列表。
❸ 允许 groups 列表包含 /apisix 的用户访问。
❹ 在代理请求之前删除原始授权标头和完整 Cookie 标头(包括网关会话 Cookie)。如果上游应用需要 Cookie,请检查此设置。
将受保护服务添加到部署使用的完整期望状态文件中:
services:
  - name: acl-oidc-groups
    labels:
      docs-example: acl-oidc-groups
    routes:
      - name: acl-oidc-groups
        uris:
          - /anything/user/*
        plugins:
          openid-connect:
            client_id: "${KEYCLOAK_CLIENT_ID}"
            client_secret: "${KEYCLOAK_CLIENT_SECRET}"
            discovery: "${KEYCLOAK_DISCOVERY}"
            redirect_uri: http://localhost:9080/anything/user/callback
            bearer_only: false
            use_pkce: true
            scope: openid profile email
            session:
              secret: "${API7_SESSION_SECRET}"
            set_access_token_header: false
            set_id_token_header: false
            set_userinfo_header: false
          acl:
            external_user_label_field: groups
            allow_labels:
              groups:
                - /apisix
          proxy-rewrite:
            headers:
              remove:
                - Authorization
                - Cookie
    upstream:
      type: roundrobin
      nodes:
        - host: httpbin.org
          port: 80
          weight: 1
❶ 启动浏览器身份验证,并向 Keycloak 发送 S256 PKCE 质询。
❷ 从 Keycloak 返回的 OIDC 用户信息中读取 groups 列表。
❸ 允许 groups 列表包含 /apisix 的用户访问。
❹ 在代理请求之前删除原始授权标头和完整 Cookie 标头(包括网关会话 Cookie)。如果上游应用需要 Cookie,请检查此设置。
预览此示例所管理的变更,并确认差异中没有意外的更新或删除:
adc diff -f adc.yaml \
  --include-resource-type service \
  --label-selector docs-example=acl-oidc-groups
同步已检查的服务配置:
adc sync -f adc.yaml \
  --include-resource-type service \
  --label-selector docs-example=acl-oidc-groups
应用任一清单前,请替换 Keycloak 主机、客户端密钥和会话密钥占位符。
- Gateway API
- APISIX CRD
创建外部上游 Service、插件配置和受保护路由:
apiVersion: v1
kind: Service
metadata:
  namespace: aic
  name: httpbin-external-domain
spec:
  type: ExternalName
  externalName: httpbin.org
---
apiVersion: apisix.apache.org/v1alpha1
kind: PluginConfig
metadata:
  namespace: aic
  name: acl-oidc-groups
spec:
  plugins:
    - name: openid-connect
      config:
        client_id: apisix-quickstart-client
        client_secret: replace-with-client-secret
        discovery: http://replace-with-keycloak-host:8080/realms/quickstart-realm/.well-known/openid-configuration
        redirect_uri: http://localhost:9080/anything/user/callback
        bearer_only: false
        use_pkce: true
        scope: openid profile email
        session:
          secret: replace-with-32-byte-session-secret
        set_access_token_header: false
        set_id_token_header: false
        set_userinfo_header: false
    - name: acl
      config:
        external_user_label_field: groups
        allow_labels:
          groups:
            - /apisix
    - name: proxy-rewrite
      config:
        headers:
          remove:
            - Authorization
            - Cookie
---
apiVersion: gateway.networking.k8s.io/v1
kind: HTTPRoute
metadata:
  namespace: aic
  name: acl-oidc-groups
spec:
  parentRefs:
    - name: apisix
  rules:
    - matches:
        - path:
            type: PathPrefix
            value: /anything/user/
      filters:
        - type: ExtensionRef
          extensionRef:
            group: apisix.apache.org
            kind: PluginConfig
            name: acl-oidc-groups
      backendRefs:
        - name: httpbin-external-domain
          port: 80
将配置应用到集群:
kubectl apply -f acl-oidc-gateway-api.yaml
创建基于域名的上游和受保护路由:
apiVersion: apisix.apache.org/v2
kind: ApisixUpstream
metadata:
  namespace: aic
  name: httpbin-external-domain
spec:
  ingressClassName: apisix
  externalNodes:
    - type: Domain
      name: httpbin.org
---
apiVersion: apisix.apache.org/v2
kind: ApisixRoute
metadata:
  namespace: aic
  name: acl-oidc-groups
spec:
  ingressClassName: apisix
  http:
    - name: acl-oidc-groups
      match:
        paths:
          - /anything/user/*
      upstreams:
        - name: httpbin-external-domain
      plugins:
        - name: openid-connect
          enable: true
          config:
            client_id: apisix-quickstart-client
            client_secret: replace-with-client-secret
            discovery: http://replace-with-keycloak-host:8080/realms/quickstart-realm/.well-known/openid-configuration
            redirect_uri: http://localhost:9080/anything/user/callback
            bearer_only: false
            use_pkce: true
            scope: openid profile email
            session:
              secret: replace-with-32-byte-session-secret
            set_access_token_header: false
            set_id_token_header: false
            set_userinfo_header: false
        - name: acl
          enable: true
          config:
            external_user_label_field: groups
            allow_labels:
              groups:
                - /apisix
        - name: proxy-rewrite
          enable: true
          config:
            headers:
              remove:
                - Authorization
                - Cookie
将配置应用到集群:
kubectl apply -f acl-oidc-apisix-crd.yaml
验证基于用户组的访问控制
在浏览器中访问 http://localhost:9080/anything/user/get。API7 Gateway 会将你重定向到 Keycloak。使用 quickstart-user 登录。
身份验证后,API7 Gateway 会从 Keycloak 用户信息中读取 /apisix 值,允许请求并将其转发到上游。响应应包含与以下内容类似的字段:
{
  "args": {},
  "headers": {
    "Host": "localhost",
    "X-Forwarded-Host": "localhost:9080"
  },
  "method": "GET",
  "url": "http://localhost:9080/anything/user/get"
}
上游响应不应包含网关会话 Cookie、访问 Token、ID Token 或用户信息标头。
若要验证拒绝行为,请在上述配置中将 allow_labels.groups 下的 /apisix 更改为 /nonmember。
- Admin API
- ADC
- Ingress Controller
通过 Admin API 更新路由:
curl "http://127.0.0.1:9180/apisix/admin/routes/acl-oidc-groups" -X PATCH \
  -H "X-API-KEY: ${ADMIN_API_KEY}" \
  -d '{
    "plugins": {
      "acl": {
        "allow_labels": {
          "groups": ["/nonmember"]
        }
      }
    }
  }'
预览更新后的完整期望状态:
adc diff -f adc.yaml \
  --include-resource-type service \
  --label-selector docs-example=acl-oidc-groups
同步已检查的变更:
adc sync -f adc.yaml \
  --include-resource-type service \
  --label-selector docs-example=acl-oidc-groups
使用上方选择的同一种 Kubernetes API 应用更新后的完整清单:
kubectl apply -f acl-oidc-gateway-api.yaml
如果选择了 APISIX CRD 标签页,请改为应用 acl-oidc-apisix-crd.yaml。
重新加载受保护路由。由于经过身份验证的用户不属于 /nonmember,响应应为 HTTP/1.1 403 Forbidden。
根据嵌套 OIDC 用户组控制访问
API7 Gateway 还可以使用 JSONPath 表达式从嵌套 OIDC 用户信息中提取标签。此示例扩展前面的 Keycloak 配置,在 acl_labels.nested.groups 中返回用户组列表。
在专用客户端作用域中,再创建一个 Group Membership 映射器,并配置以下字段:
| 字段 | 值 |
|---|---|
| Name | nested-groups |
| Token Claim Name | acl_labels.nested.groups |
| Full group path | 开启 |
| Add to userinfo | 开启 |
配置映射器后,选择 Save。
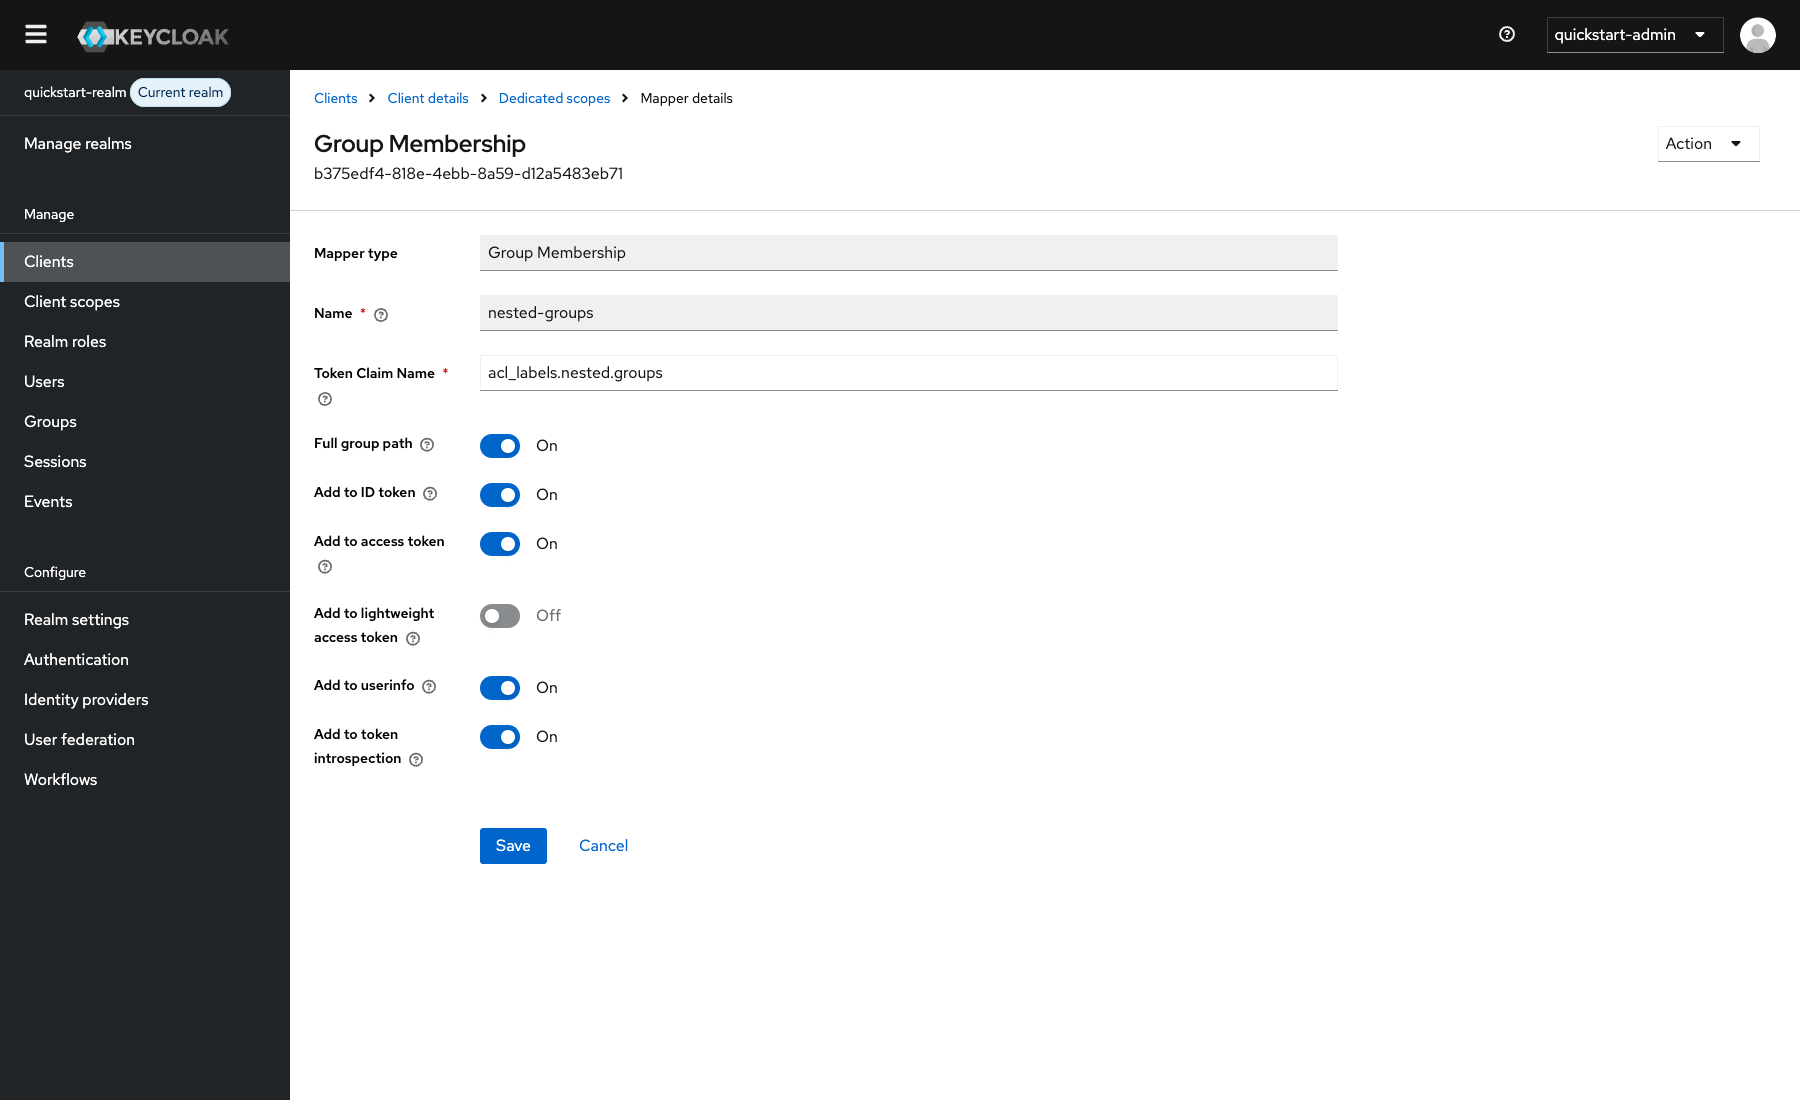
Keycloak 现在会在类似以下结构的嵌套对象中返回用户组列表:
{
  "acl_labels": {
    "nested": {
      "groups": [
        "/apisix",
        "/opensource"
      ]
    }
  }
}
更新现有路由上的 acl 配置,以读取嵌套列表。
- Admin API
- ADC
- Ingress Controller
通过 Admin API 更新路由:
curl "http://127.0.0.1:9180/apisix/admin/routes/acl-oidc-groups" -X PATCH \
  -H "X-API-KEY: ${ADMIN_API_KEY}" \
  -d '{
    "plugins": {
      "acl": {
        "external_user_label_field": "$.acl_labels.nested.groups",
        "external_user_label_field_key": "groups",
        "external_user_label_field_parser": "table",
        "allow_labels": {
          "groups": ["/apisix"]
        }
      }
    }
  }'
❶ 使用 JSONPath 表达式选择嵌套用户组列表。
❷ 将提取的值与访问控制列表匹配时,使用 groups 作为键。
❸ 将 Keycloak 声明解析为列表。只有当所选值为序列化的 JSON 字符串时,才使用 json 解析器。
❹ 允许提取出的用户组列表包含 /apisix 的用户访问。
在 adc.yaml 中,将现有 acl 配置替换为以下值:
acl:
  external_user_label_field: "$.acl_labels.nested.groups"
  external_user_label_field_key: groups
  external_user_label_field_parser: table
  allow_labels:
    groups:
      - /apisix
❶ 使用 JSONPath 表达式选择嵌套用户组列表。
❷ 将提取的值与访问控制列表匹配时,使用 groups 作为键。
❸ 将 Keycloak 声明解析为列表。只有当所选值为序列化的 JSON 字符串时,才使用 json 解析器。
❹ 允许提取出的用户组列表包含 /apisix 的用户访问。
预览完整的期望状态变更:
adc diff -f adc.yaml \
  --include-resource-type service \
  --label-selector docs-example=acl-oidc-groups
同步已检查的配置:
adc sync -f adc.yaml \
  --include-resource-type service \
  --label-selector docs-example=acl-oidc-groups
在完整清单中,将现有 acl 插件配置替换为以下值:
external_user_label_field: "$.acl_labels.nested.groups"
external_user_label_field_key: groups
external_user_label_field_parser: table
allow_labels:
  groups:
    - /apisix
使用前一个示例中选择的同一种 Kubernetes API 应用更新后的完整清单。
在新的隐私浏览器会话中打开 http://localhost:9080/anything/user/get 并重新登录。由于前一个示例创建的网关会话包含之前的用户信息,因此需要重新进行身份验证。响应应为 HTTP/1.1 200 OK,这表明 API7 Gateway 已成功提取并匹配嵌套的 Keycloak 用户组列表。